Following on from a recent post http://www.geothread.net/iot-project-using-an-esp32-device-to-check-a-web-service/, here at Cranfield University, we wanted to explore the use of ‘Push Notifications‘ to a mobile phone or tablet from an event triggered on a ESP8266 Internet of Things device. This could be useful for a range of applications – for example following a trigger from a sensor to indicate that some threshold has been exceeded (e.g. a set temperature or humidity), or from the utility previously described, testing periodically to see if a web service is running or not. Contents: Parts required Push notification configuration and Prowl Hardware Configuring Arduino Test Sketch Results Next Steps Buttons Sketch Web Service monitoring with push notifications To get this all working we need a simple test rig, described here, to bring together all the parts.
Parts required:
top IOS device – Apple iPhone (Android is OK too – comments below) – installed with ‘Prowl’ app ESP8266 device – We used a ‘TOOGOO ESP8266’ Arduino IDE correctly configured – installed with ESP8266WiFi and EspProwl libraries – suitable serial driverPush notification configuration and Prowl:
top If we want to be informed of Internet events, we can make devices trigger communications in. number of ways – examples being emails, tweets, and push notifications. Of these, ‘Push Notifications’ are the most immediate. They can put a note up on the home screen of a mobile device (phone or tablet) to draw immediate attention. We used a mobile phone for this test, an Apple iPhone running IOS.
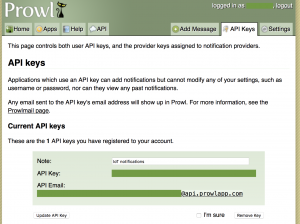
The leading IOS push notifier is Prowl – https://www.prowlapp.com. The web service is free to use, so we registered a login account with Prowl. The next step is to generate a unique API keycode in Prowl. In doing this, a short description can be added to remind what it relates to, e.g. ‘IoT notifications’. One can have multiple API key codes for different applications/projects.
If we want to be informed of Internet events, we can make devices trigger communications in. number of ways – examples being emails, tweets, and push notifications. Of these, ‘Push Notifications’ are the most immediate. They can put a note up on the home screen of a mobile device (phone or tablet) to draw immediate attention. We used a mobile phone for this test, an Apple iPhone running IOS.
The leading IOS push notifier is Prowl – https://www.prowlapp.com. The web service is free to use, so we registered a login account with Prowl. The next step is to generate a unique API keycode in Prowl. In doing this, a short description can be added to remind what it relates to, e.g. ‘IoT notifications’. One can have multiple API key codes for different applications/projects.
 Once that is done, the next step is to install the Prowl app on the iPhone. The app is available on the iTunes App Store.
Note that the app is not free, but it is priced modestly, and is fair given the great service Prowl provides. Once the app is installed, the account details set above on the website can be entered.
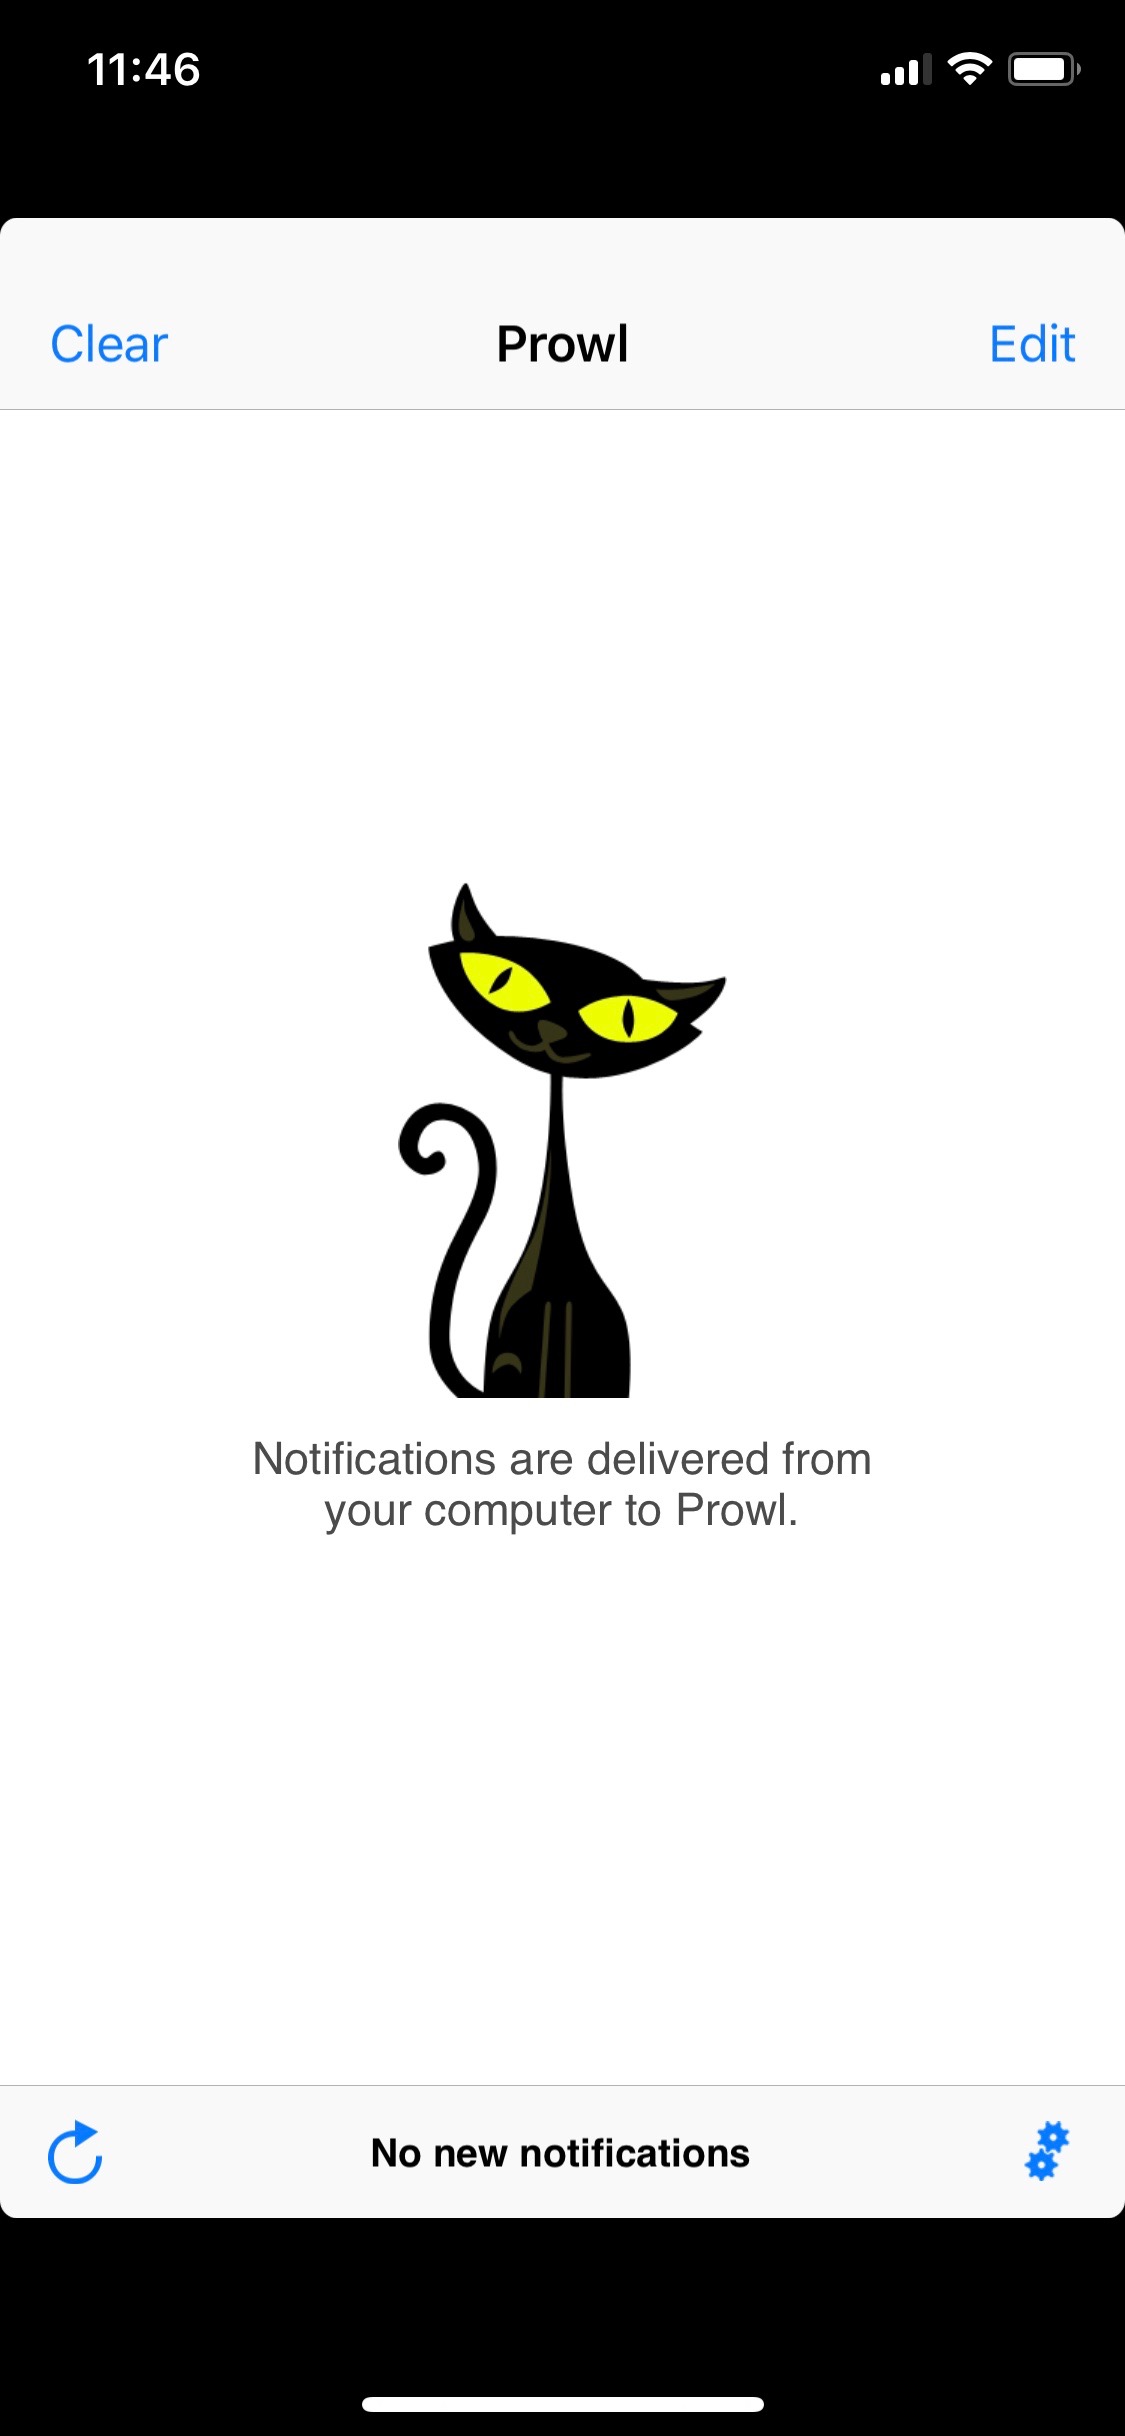
We are now ready to receive push notifications.
Once that is done, the next step is to install the Prowl app on the iPhone. The app is available on the iTunes App Store.
Note that the app is not free, but it is priced modestly, and is fair given the great service Prowl provides. Once the app is installed, the account details set above on the website can be entered.
We are now ready to receive push notifications.
Android
The Prowl app is designed for IOS devices. Android has its own equivalent utilities such as PushBullet, described in a similar tutorial blog online here.Hardware:
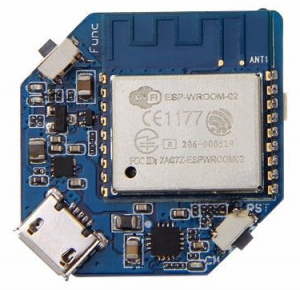
top The last post used an ESP32 device. These chips are newer than the ESP8266 devices, being slightly more expensive, and with BlueTooth as an additional feature alongside WiFi. To keep costs down, we used the TOOGOO ESP8266 device, available from a range of providers, eg. Amazon. The ESP8266 is described well in this blog article.Configuring Arduino:
top The ESP8266 device is designed to operate with the Arduino IDE development environment. As described fully in the earlier post, using a MacBook, one needs to install a serial driver to communicate with the hardware, and the appropriate cables. Next, as the device is an ESP8266, we need to install the appropriate device libraries.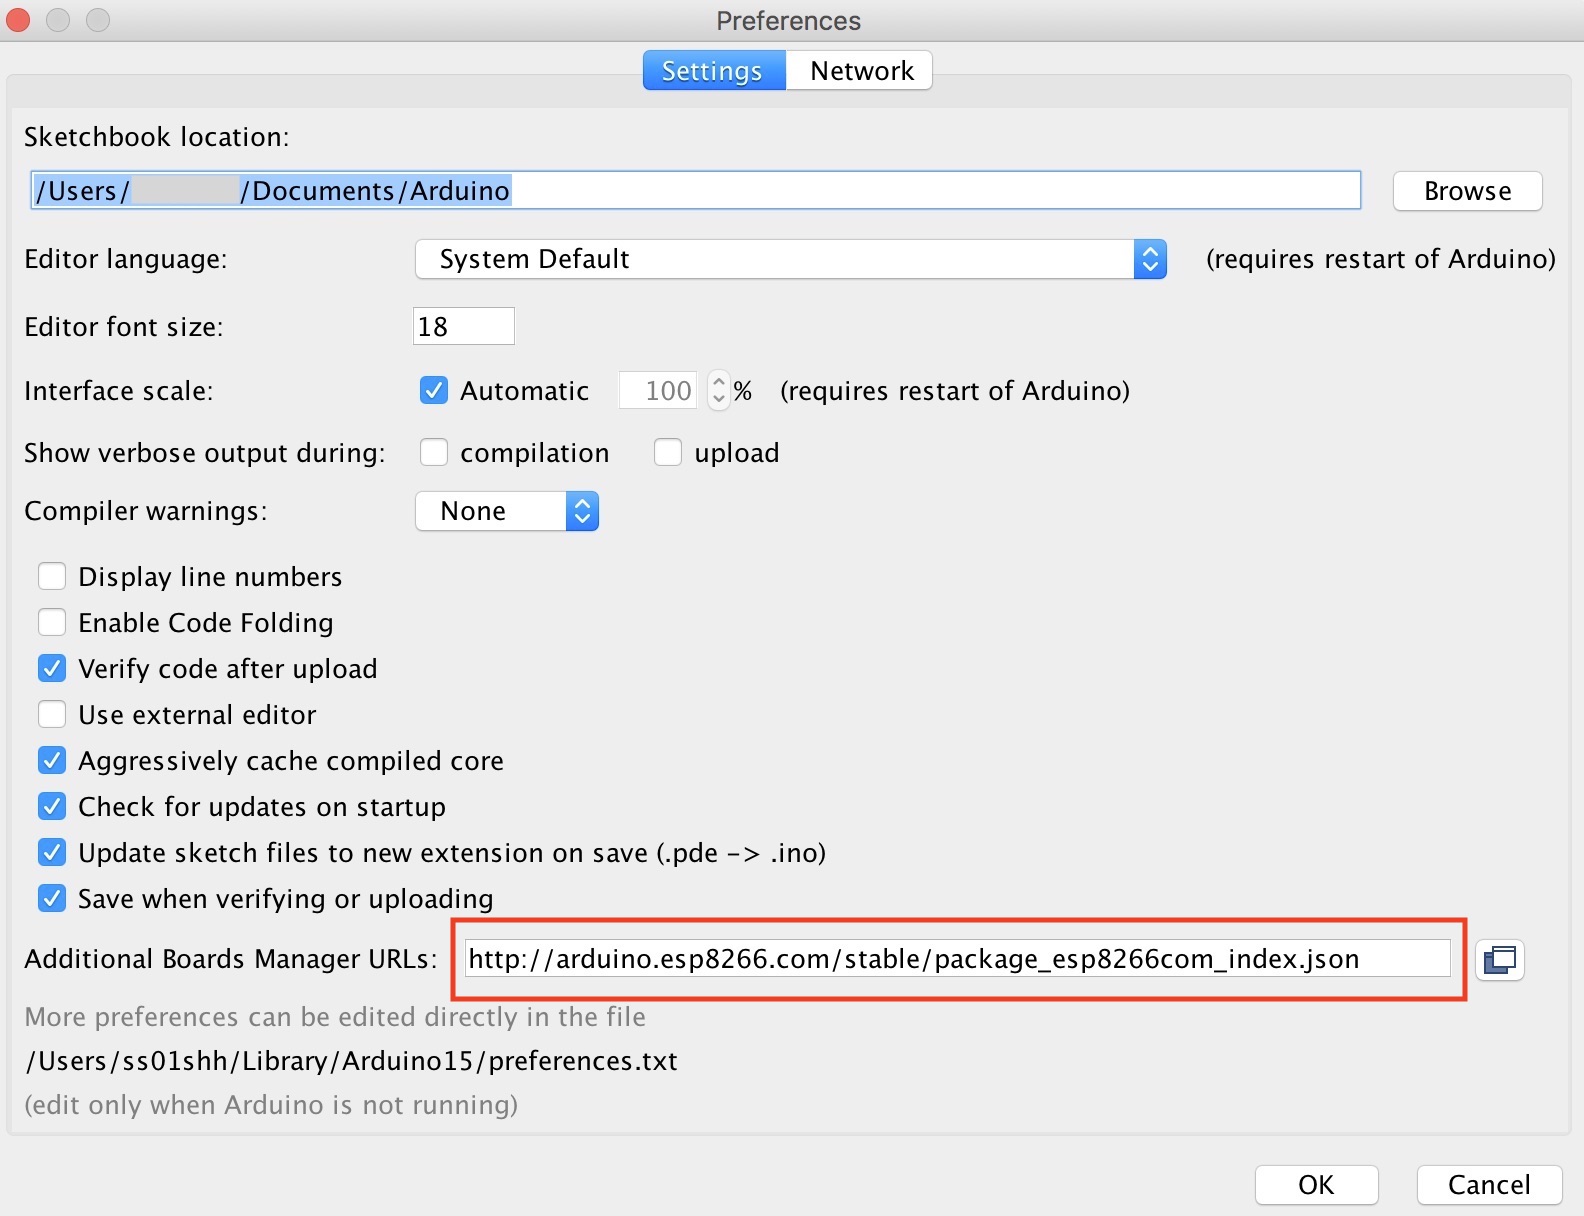 In the Arduino ‘Preferences’ dialog, one can add references to external libraries through adding a line to the source. We added the ESP8266 source thus:
http://arduino.esp8266.com/stable/package_esp8266com_index.json
Now in the Arduino, under ‘Sketch’ -> ‘Include Library’, we can see ‘ESP8266WiFi’, which can be added to our test sketch.
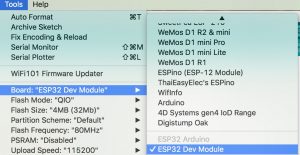
For the particular TOOGOO ESP8266 device, we used the Arduino board definition ‘NodeMCU 1.0 (ESP-12e Module)’.
EPS8266 notifications
We now need a means in the Arduino code sketch to configure and initiate push notifications. Fortunately we can use the excellent EspProwl library described online at https://github.com/marcos69/EspProwl. The code here can be downloaded to the library folder of the Arduino installation folder. Now the library can be added to the Sketch code (e.g.#include <EspProwl.h>), and then used in the code.
Once this is all in place, we can develop a minimal test sketch to open a WiFi connection and initiate a push notification.
Test Sketch code:
top
#include <ESP8266WiFi.h>
#include <EspProwl.h>

// WiFi parameters
char* ssid = "MYSSID";
char* password = "MYWIFIKEY";

void setup() {
       // Start Serial
       Serial.begin(115200);
       WiFi.begin(ssid, password);
       while (WiFi.status() != WL_CONNECTED) {
          delay(500);
          Serial.print(".");
       }
       Serial.println("");
       Serial.println("WiFi now connected at address");
       // Print the IP address
       Serial.println(WiFi.localIP());
       EspProwl.begin();
       EspProwl.setApiKey("MY_PROWL_API_CODE");
       EspProwl.setApplicationName("ESP6266 Prowl test");
       int returnCode = EspProwl.push("Hello World event", "Initial notification", 0);
}

void loop() {
  // not used in this test
}
Results:
top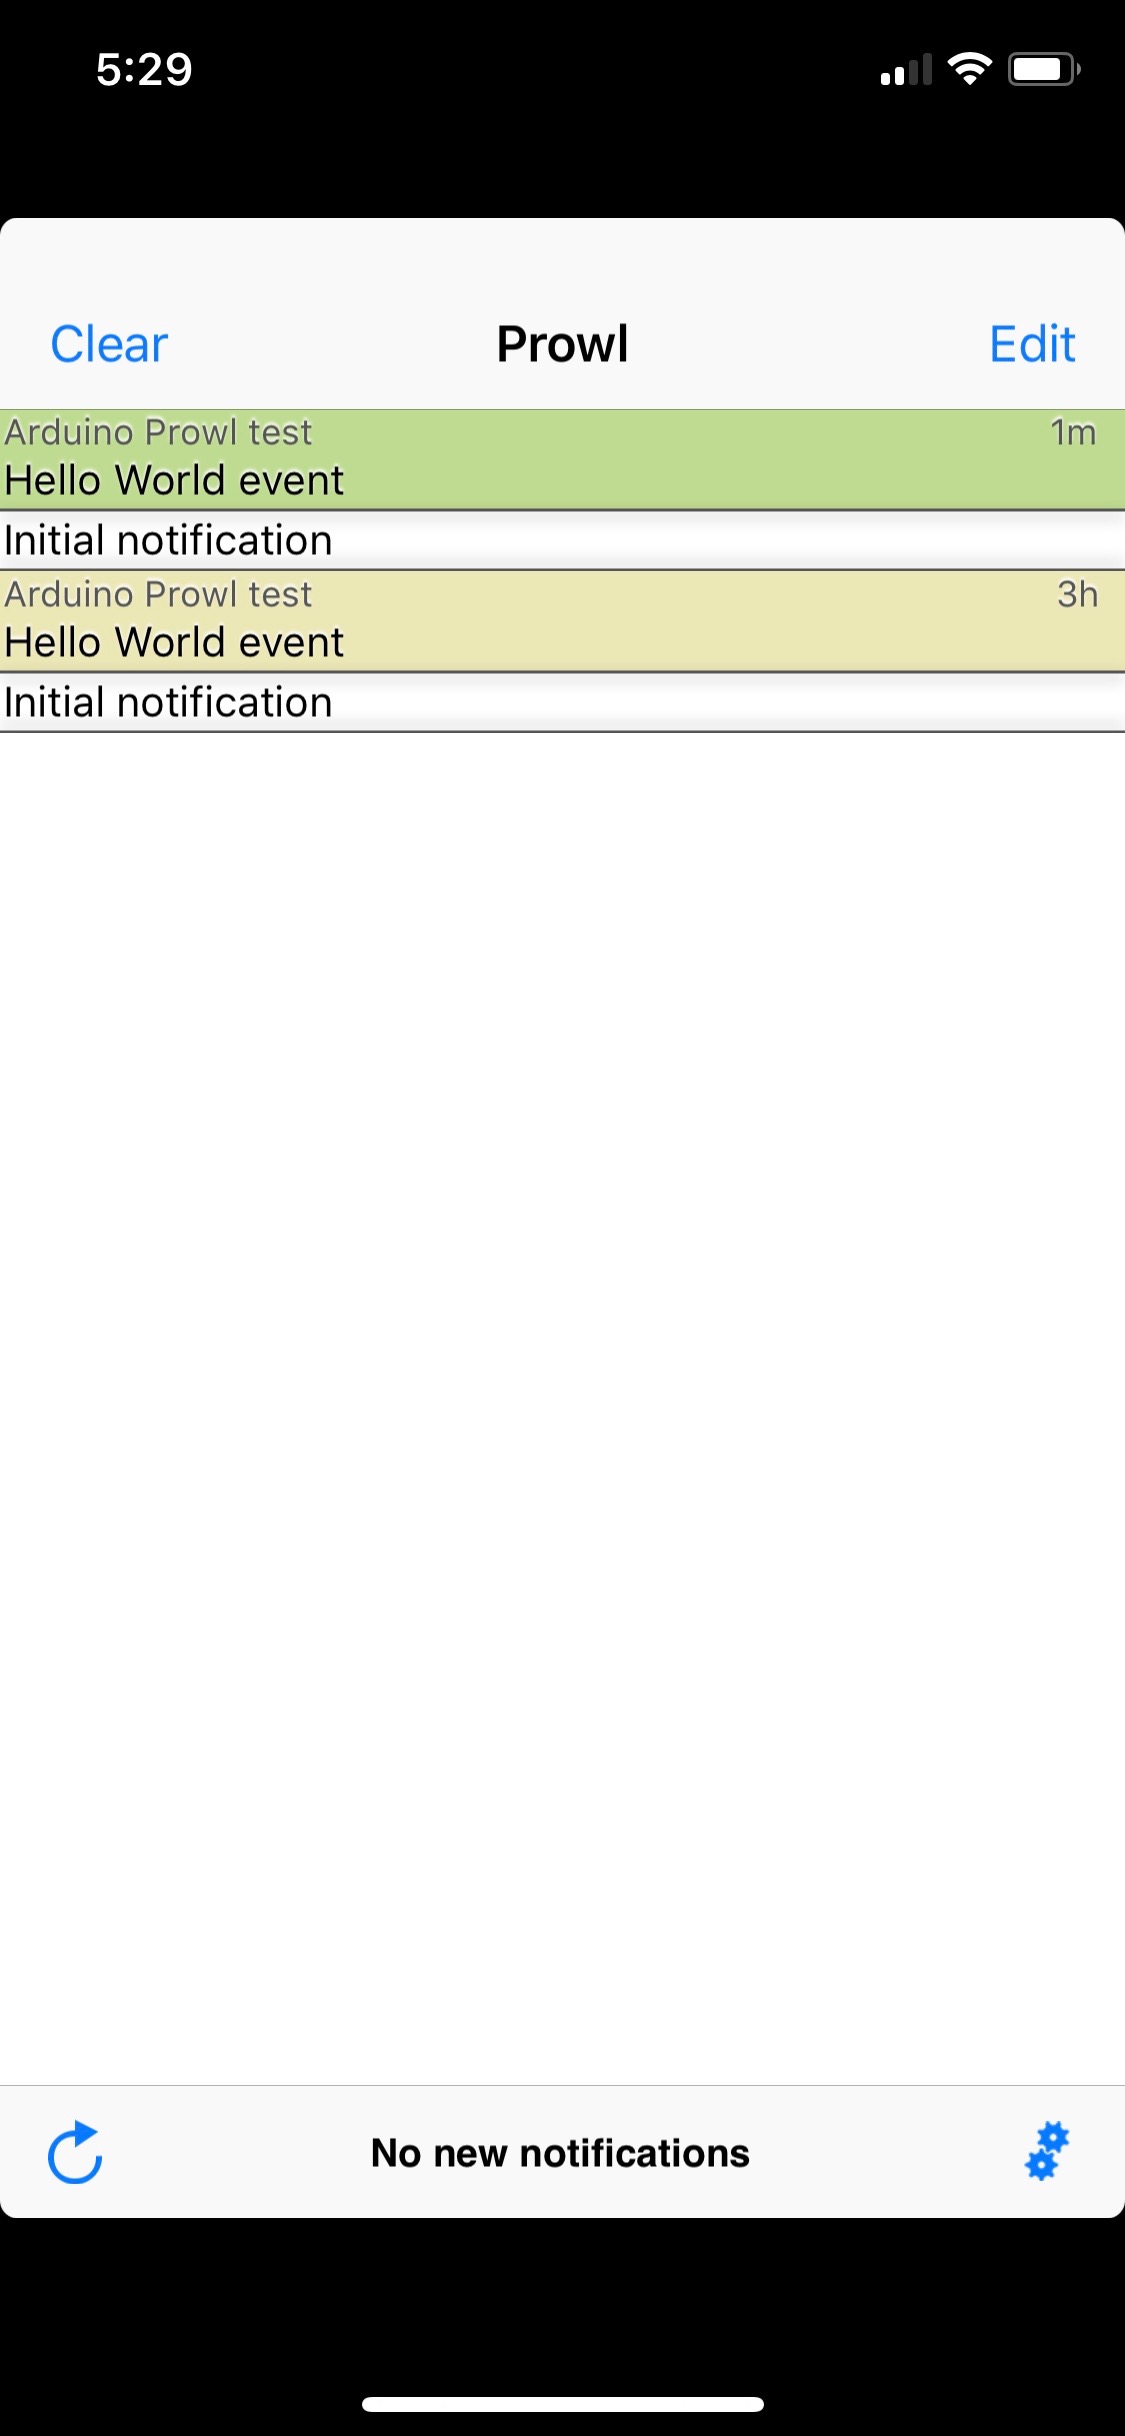 The result of the test sketch is that once it runs, a WiFi connection is made, and then a push notification initiated. Note that the push here is placed in the ‘Setup’ block – so it only runs once (fine for testing). Note also that one can firstly set an Application Name, and secondly, a Push Title and Message. This permits a lot of flexibility in the messaging options open. Hopefully when run the results will appear on the mobile device as shown.
The Prowl app does permit some filtering and the ability to (temporarily) filter messages and have quiet times etc. which could be useful if there are a lot of messages appearing.
The result of the test sketch is that once it runs, a WiFi connection is made, and then a push notification initiated. Note that the push here is placed in the ‘Setup’ block – so it only runs once (fine for testing). Note also that one can firstly set an Application Name, and secondly, a Push Title and Message. This permits a lot of flexibility in the messaging options open. Hopefully when run the results will appear on the mobile device as shown.
The Prowl app does permit some filtering and the ability to (temporarily) filter messages and have quiet times etc. which could be useful if there are a lot of messages appearing.
Next Steps:
top This project has shown how to create push notifications, triggered by the ESP8266 device. Note, we used the Setup block in the code example above – in reality one would use the ‘Loop’ block for event monitoring and message triggering. However, more programmatic control is needed for this to be used in a real project. For example, if one is say monitoring temperature every few minutes, the operator may not wish to receive a push notification at the same frequency, or once messaged, another trigger notification may not be wanted until the threshold is crossed once more. In either case, a secondary ‘loop’ or register could be configured in the code sketch, within the continuously running 5 minute loop, so as to restrict messaging to say an hourly basis or just when significant changes occur – this might prove especially relevant if some other action is being undertaken at the finer timestep – such as database logging of data. It depends on the application – but overall push notifications offer a very useful tool for building up control and monitoring systems.Buttons Sketch:
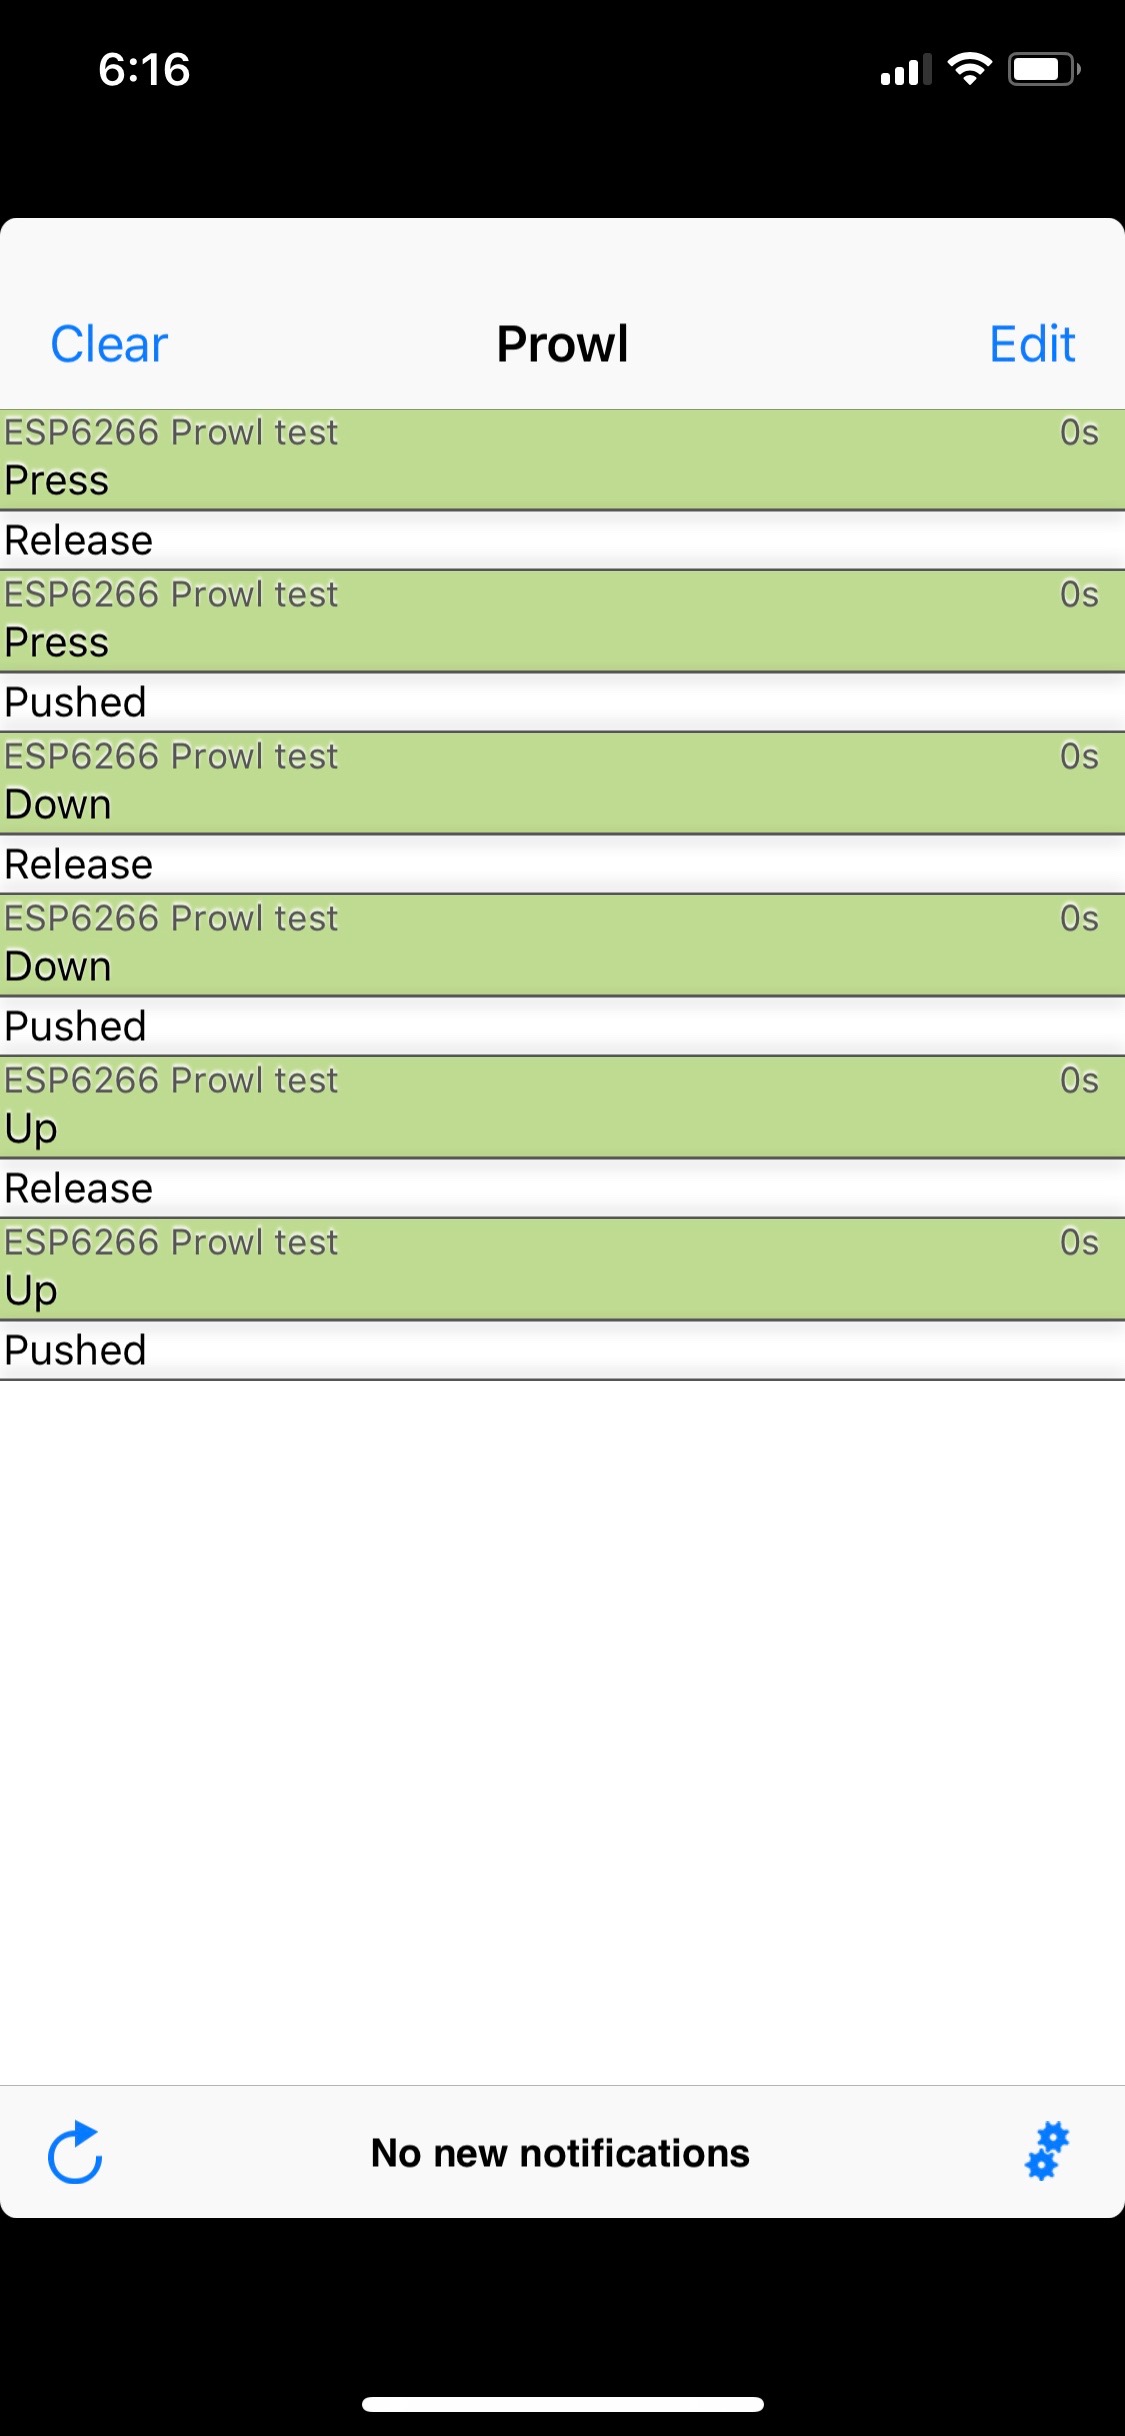
top The hardware device also has a few in-built buttons. So we created a simple sketch that triggers push notifications when they are pressed and released:
#include <avdweb_Switch.h>
// See https://github.com/avandalen/avdweb_Switch
#include <ESP8266WiFi.h>
#include <EspProwl.h>
// Drawing on code at https://github.com/marcos69/EspProwl

// Buttons - FLATH, RSET, D5, D6, D7
const byte buttonUp_Pin = D6;
Switch buttonUp = Switch(buttonUp_Pin);
const byte buttonDown_Pin = D7;
Switch buttonDown = Switch(buttonDown_Pin);
const byte buttonPress_Pin = D5;
Switch buttonPress = Switch(buttonPress_Pin);
int i;

// WiFi parameters
char* ssid = "MYSSID";
char* password = "MYWIFIKEY";

void setup() {
       Serial.begin(115200);
       Serial.println("Starting:");
       WiFi.begin(ssid, password);
       while (WiFi.status() != WL_CONNECTED) {
          delay(500);
          Serial.print(".");
       }
       Serial.println("");
       Serial.println("WiFi now connected at address");
       // Print the IP address
       Serial.println(WiFi.localIP());
       EspProwl.begin();
       EspProwl.setApiKey("MY_PROWL_API_CODE");
       EspProwl.setApplicationName("ESP6266 Prowl test");
       int returnCode = EspProwl.push("Button press test", "Ready", 0);
}

void loop() {
       buttonUp.poll();
       if(buttonUp.pushed()) {
           Serial.print(++i); Serial.print(" "); Serial.print("Up pushed, ");
           int returnCode = EspProwl.push("Up", "Pushed", 0);
       }
       if(buttonUp.released()) {
           Serial.println("Up released");
           int returnCode = EspProwl.push("Up", "Release", 0);
       }
       buttonDown.poll();
       if(buttonDown.pushed()) {
           Serial.print(++i); Serial.print(" "); Serial.print("Down pushed, ");
           int returnCode = EspProwl.push("Down", "Pushed", 0);
       }
       if(buttonDown.released()) {
            Serial.println("Down released");
            int returnCode = EspProwl.push("Down", "Release", 0);
       }
       buttonPress.poll();
       if(buttonPress.pushed()) {
            Serial.print(++i); Serial.print(" "); Serial.print("Press pushed, ");
            int returnCode = EspProwl.push("Press", "Pushed", 0);
       }
       if(buttonPress.released()) {
            Serial.println("Press released");
            int returnCode = EspProwl.push("Press", "Release", 0);
       }
}
Web Service monitoring with push notifications:
top An earlier blog showed how to use an EPS device to monitor a web service, http://www.geothread.net/iot-project-using-an-esp32-device-to-check-a-web-service/. We can revisit that code now, and add in Prowl push alert code. We can also make the code a little more sophisticated too to avoid false positives. As before you will need to add in the SSID and WiFi passcode, and the website address and REST endpoint, as well as the Prowl API code. Here is the source code, edited to work on an EPS8266 device, rather than EPS32 device (its the slightly cheaper older chip).
// TTGO EPS8266_WebServiceCheck : WiFi & Bluetooth Battery ESP32 Module - webservices checker

// Import required libraries
#include
#include
#include
#include
#include
#include
#include "images.h"
#include "fonts.h"
#include
#include

// The built-in OLED is a 128*64 mono pixel display
// i2c address = 0x3c
// SDA = 5
// SCL = 4
SSD1306 display(0x3c, 5, 4);

// Web service to check
const int httpPort = 80;
const char* host = "MYWEBSERVICE_HOSTNAME";

// WiFi parameters
const char* ssid = "MYSSID";
const char* password = "MYWIFIKEY";

void setup() {
       // Initialize the display
       display.init();
       //display.flipScreenVertically();
       display.setFont(Roboto_Medium_14);

       // Start Serial
       Serial.begin(115200);
       // Connect to WiFi
       display.drawString(0, 0, "Going online");
       display.drawXbm(34, 14, WiFi_Logo_width, WiFi_Logo_height, WiFi_Logo_bits);
       display.display();
       WiFi.begin(ssid, password);
       while (WiFi.status() != WL_CONNECTED) {
          delay(500);
          Serial.print(".");
       }
       Serial.println("");
       Serial.println("WiFi now connected at address");
       // Print the IP address
       Serial.println(WiFi.localIP());
       display.clear();
       EspProwl.begin();
       EspProwl.setApiKey("MY_PROWL_API_CODE");
       EspProwl.setApplicationName("Web Service Checker");
       int returnCode = EspProwl.push("Checker", "System up", 0);
}

void loop() {
       Serial.print("\r\nConnecting to ");
       Serial.println(host);
       display.clear();
       display.setTextAlignment(TEXT_ALIGN_LEFT);
       display.drawString(0, 0, "Check web service");
       display.display();
       Serial.println("Check web service");

       // Setup URI for GET request
       String url = "/PATH/TO/REST/ENDPOINT/";
       // if service is up ok, return will contain: 'Service running'

       WiFiClient client;
       if (!client.connect(host, httpPort)) {
         Serial.println("Connection failed");
         display.clear();
         display.drawString(0, 0, "Connection failed");
         display.display();
         return;
       }

       client.print("GET " + url + " HTTP/1.1\r\n");
       client.print("Host: " + (String)host + "\r\n");
       client.print("Authorization: Basic YWRtaW46NSs2KndralhLcVApOVd2JWokQ2o=\r\n");
       client.print("User-Agent: Arduino/1.0\r\n");
       client.print("Cache-Control: no-cache\r\n\r\n");

       // Read all the lines of the reply from server
       delay(800);
       bool running = false;
       while (client.available()) {
         String line = client.readStringUntil('\r\n');
         Serial.println(line);
         if (line == "Service running") {
           running = true;
         }
       }
       if (running == true) {
           display.drawString(0, 25, "Service up OK");
           display.display();
           delay(3000);
           ProwlAlert(running);
       } else {
           display.drawString(0, 25, "Service DOWN");
           display.display();
           delay(3000);
           ProwlAlert(running);
       }

       Serial.println();
       Serial.println("Closing connection");
       Serial.println("=================================================");
       Serial.println("Sleeping");
       display.clear();
       display.drawString(0, 0, "Closing connection");
       display.display();
       delay(1000);
       display.clear();
       client.stop();
       // progress bar
       for (int i=1; i<=28; i++) {
         float progress = (float) i / 28 * 100;
         delay(500); // = all adds up to delay 14000 (14 sec)
         // draw percentage as String
         display.drawProgressBar(0, 32, 120, 10, (uint8_t) progress);
         display.display();
         display.setTextAlignment(TEXT_ALIGN_CENTER);
         display.drawString(64, 15, "Sleeping " + String((int) progress) + "%");
         display.display();
         display.clear();
         Serial.print((int) progress);Serial.print(",");
       }
       delay (1000);
}

int ProwlAlert(bool running) {
        // prevent too many false positives
        static int counter = 0;
        static bool resumed = true;
        int returnCode = -999;
        Serial.print("Status: ");
        Serial.print(running);
        Serial.print(" | Run count: ");
        Serial.println(counter);
        if (running == true) {
           counter = 0;
           if (resumed == false) {
              returnCode = EspProwl.push("Checker", "Service resumed as normal", 0);
              resumed = true;
           }
        } else {
           counter = counter + 1;
           resumed = false;
        }
        if (counter == 5) {
           returnCode = EspProwl.push("Checker", "Service detected as being down - attention required", 0);
           counter = 0;
        }
        return returnCode;
}
]]>