


 There is a lot of interest in the Internet of Things here at Cranfield University. Especially now there is a new generation of super-cheap ESP8266 and ESP32 devices which can be deployed as IoT controllers. Many of these devices are now also available with in-built OLED screens – very helpful for showing messages and diagnostics.
We will use one of these devices to develop our project.
Contents
The project
The device
Coding the EPS32
Configuring the development environment
– Connecting to the device
– USB drivers
– OLED Screen drivers
– Configuring the Arduino IDE
– Uploading the Source Code
– The Source Code
– – Authorisation
In operation
Next steps
There is a lot of interest in the Internet of Things here at Cranfield University. Especially now there is a new generation of super-cheap ESP8266 and ESP32 devices which can be deployed as IoT controllers. Many of these devices are now also available with in-built OLED screens – very helpful for showing messages and diagnostics.
We will use one of these devices to develop our project.
Contents
The project
The device
Coding the EPS32
Configuring the development environment
– Connecting to the device
– USB drivers
– OLED Screen drivers
– Configuring the Arduino IDE
– Uploading the Source Code
– The Source Code
– – Authorisation
In operation
Next steps
The project
top Nowadays, web services are used for all sorts of applications – for providing access to data and functionality online. A useful application then for the EPS32 is for it to act as a monitor for a web service, repeatedly polling the service to see if it is operating correctly. If the web service goes down, we need to know – the EPS32 can keep an eye on the service and report any problems. This project describes how an EPS32 device can be configured and programmed to monitor a web service. The web service we will monitor is developed (in node.js) with an API that includes a ‘current status’ call – if all is well calling this returns a success message which we can capture.The device
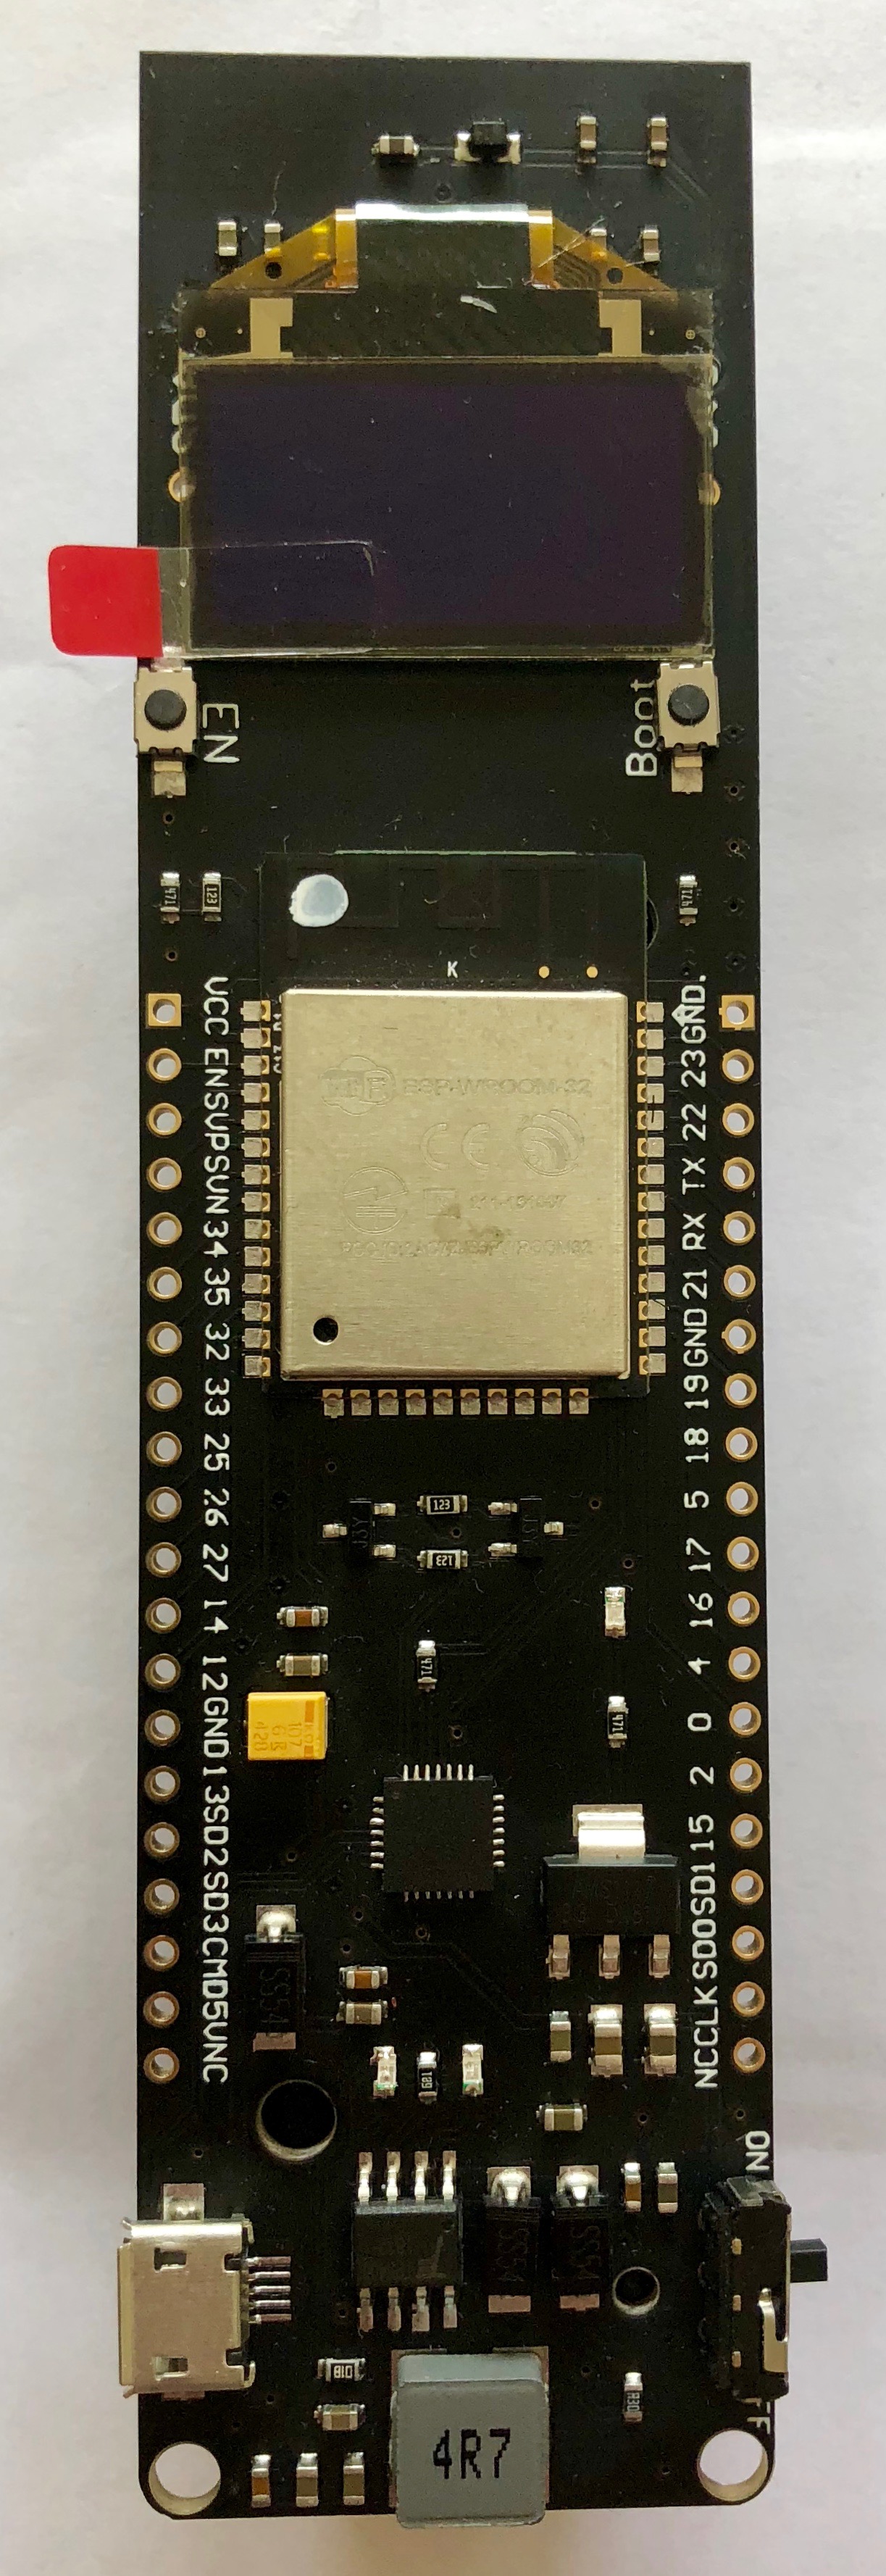
top For this project, we are using the TTGO-WiFi-Bluetooth-Battery-ESP32-Module-ESP32-0-96-inch-OLED-development-tool from Aliexpress, although these devices are widely available from many retailers. This particular model also has a battery holder for a long-use LIPO battery on the rear of the board.Coding the EPS32
top There are a few options for coding the ESP devices. Most easily, it is possible to use the Arduino development environment (with a few tweaks). Another possibility is using the Atom implementation at platformio: https://platformio.org/platformio-ide. We used the Arduino tool.Configuring the development environment
top The Arduino development environment by default does not have the libraries and configurations to allow it to programme the EPS32. There are a few steps needed to enable this.Connecting to the device
top The EPS32 board has a micro-USB port, permitting connection to the programming computer. We used an Apple Mac laptop for programming – so a micro-USB to USB-C cable/convertor was required.USB drivers
top The EPS32 device needs a software driver installed on the programming computer. We used the Silicon Labs drivers available online here. There are other alternatives (some commercial) for drivers – notably the Mac-usb-serial drivers online.OLED Screen drivers
top The EPS32 device also has an in-built OLED screen. Although very small, at 128*64 pixels, this mono display is quite large enough to show text messages with different fonts, simple bitmap graphics, progress bars and drawing elements (lines, rectangles etc.) – amazing! However, a library is needed to allow access to this device. We used the ThingPulse OLED library. The library can be downloaded as a zip file from GitHub to the library folder in the Arduino installation folder. On the Mac for example this is:
/Users/USER/Documents/Arduino/libraries/esp8266-oled-ssd1306-master
This library comes with lots of example programmes showing how to programme the screen, how to encode bitmaps, add progress bars, create fonts etc. From the code below, it can be seen that the Sketch ‘SSD1306SimpleDemo.ino‘ offers a great starting point for learning, referencing for example the ways described at Squix for encoding images and fonts. I selected the Roboto Medium font and encoded the WiFi graphic (using this online tool).
When completed, the two header files for fonts and images respectively were:
fonts header file – fonts.h
images header file – images.h
Configuring the Arduino IDE
top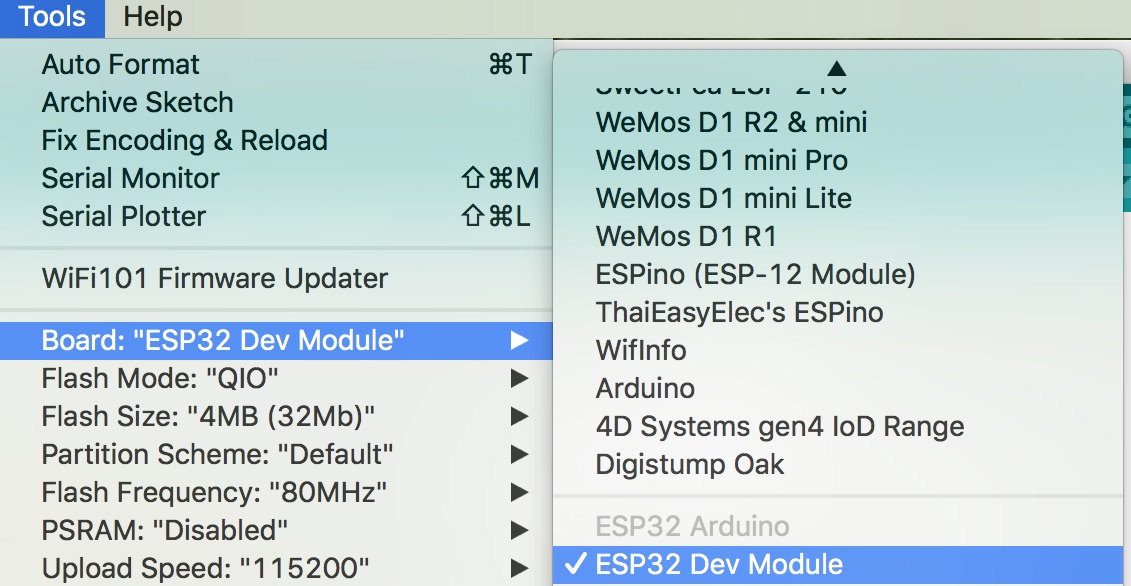 Having installed these drivers and libraries, the Arduino IDE then needs to be configured.
To do this, the board was set as a device of type ‘ESP32 Arduino’ -> ‘ESP32 Dev Module’, the baud rate set to 115200. Having installed the USB driver above, the port could be set to ‘/dev/cu.SLAB_USBtoUART’.
Having installed these drivers and libraries, the Arduino IDE then needs to be configured.
To do this, the board was set as a device of type ‘ESP32 Arduino’ -> ‘ESP32 Dev Module’, the baud rate set to 115200. Having installed the USB driver above, the port could be set to ‘/dev/cu.SLAB_USBtoUART’.
Uploading the Source Code
top The Arduino IDE allows one to compile and upload code to the device. Critically, one has to hold down the ‘Boot’ button on the device as the programme is uploaded (for a few seconds) to allow the device code to be uploaded. If the boot button is NOT held down, there will be errors reported and the code will not be uploaded! (this took ages to work out!!)The Source Code
top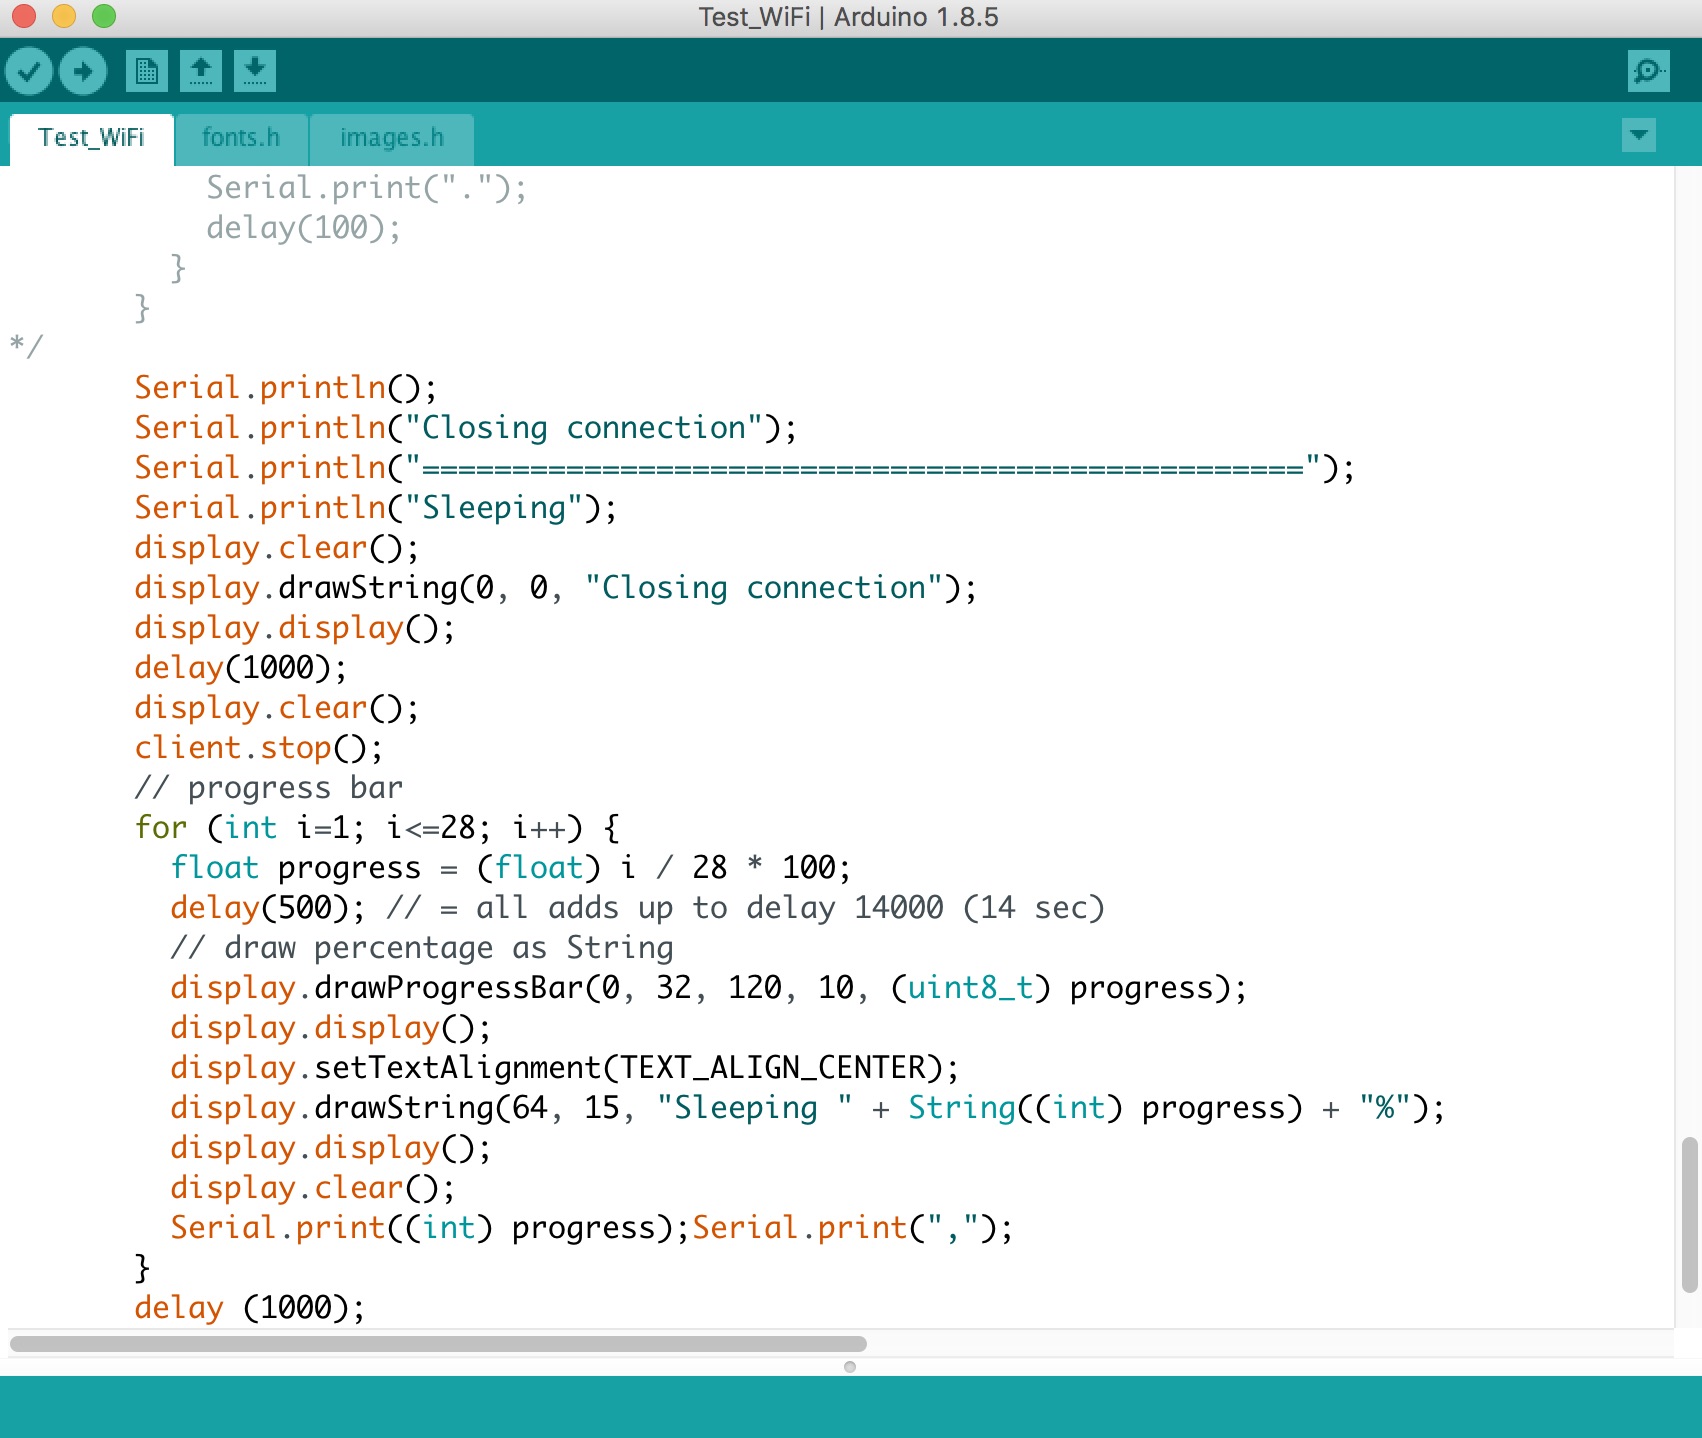 In coding the device in the Arduino development environment, one can refer usefully to the Arduino code reference. The final working code is shown below. Note the calls to the Serial monitor to allow debugging information to be shown while the device is connected to the computer.
// TTGO WiFi & Bluetooth Battery ESP32 Module - webservices checker
// Import required libraries
#include "Wire.h"
#include "OLEDDisplayFonts.h"
#include "OLEDDisplay.h"
#include "OLEDDisplayUi.h"
#include "SSD1306Wire.h"
#include "SSD1306.h"
#include "images.h"
#include "fonts.h"
#include "WiFi.h"
#include "WiFiUdp.h"
#include "WiFiClient.h"
// The built-in OLED is a 128*64 mono pixel display
// i2c address = 0x3c
// SDA = 5
// SCL = 4
SSD1306 display(0x3c, 5, 4);

// WiFi parameters
const char* ssid = "MYSSID";
const char* password = "MYWIFIKEY";

// Web service to check
const int httpPort = 80;
const char* host = "MYWEBSERVICE_HOSTNAME";

void setup() {
	// Initialize the display
	display.init();
	//display.flipScreenVertically();
	display.setFont(Roboto_Medium_14);

	// Start Serial
	Serial.begin(115200);
	// Connect to WiFi
	display.drawString(0, 0, "Going online");
	display.drawXbm(34, 14, WiFi_Logo_width, WiFi_Logo_height, 			 WiFi_Logo_bits);
	display.display();
	WiFi.begin(ssid, password);
	while (WiFi.status() != WL_CONNECTED) {
	 	 delay(500);
	 	 Serial.print(".");
	}
	Serial.println("");
	Serial.println("WiFi now connected at address");
	// Print the IP address
	Serial.println(WiFi.localIP());
	display.clear();
}

void loop() {
	Serial.print("\r\nConnecting to ");
	Serial.println(host);
	display.clear();
	display.setTextAlignment(TEXT_ALIGN_LEFT);
	display.drawString(0, 0, "Check web service");
	display.display();
	Serial.println("Check web service");

	// Setup URI for GET request
	String url = "SPECIFIC_WEBSERVICE_URL";
	// if service is up ok, return string will contain: 'Service running'

	WiFiClient client;
	if (!client.connect(host, httpPort)) {
		Serial.println("Connection failed");
		display.clear();
		display.drawString(0, 0, "Connection failed");
		display.display();
		return;
	}

	client.print("GET " + url + " HTTP/1.1\r\n");
	client.print("Host: " + (String)host + "\r\n");
	// If authorisation is needed it can go here
	//client.print("Authorization: Basic AUTHORISATION_HASH_CODE\r\n");
	client.print("User-Agent: Arduino/1.0\r\n");
	client.print("Cache-Control: no-cache\r\n\r\n");

	Serial.print("GET " + url + " HTTP/1.1\r\n");
	Serial.print("Host: " + (String)host + "\r\n");
	// If authorisation is needed it can go here
	//Serial.print("Authorization: Basic AUTHORISATION_HASH_CODE\r\n");
	Serial.print("User-Agent: Arduino/1.0\r\n");
	Serial.print("Cache-Control: no-cache\r\n\r\n");

// Here's an alternative form if the service API uses HTTP POST
/*
client.print("POST " + url + " HTTP/1.1\r\n");
client.print("Host: " + (String)host + "\r\n");
// If authorisation is needed it can go here
//client.print("Authorization: Basic AUTHORISATION_HASH_CODE\r\n");
client.print("User-Agent: Arduino/1.0\r\n");
client.print("Cache-Control: no-cache\r\n\r\n");
*/

	// Read all the lines of the reply from server
	delay(500);
	bool running = false;
	while (client.available()) {
		String line = client.readStringUntil('\r\n');
	 	Serial.println(line);
	 	if (line == "Service running") {
	 		running = true;
		}
	}
	if (running == true) {
		display.drawString(0, 25, "Service up OK");
	 	display.display();
		delay(3000);
	} else {
	 	display.drawString(0, 25, "Service DOWN");
	 	display.display();
	 	delay(3000);
		// Text/email administrator
	}

// Here's some alternative methods to read web output
/*
while (client.available()) {
	 Serial.print(">");
	 char c = client.read();
	 Serial.print(c);
	 Serial.print("<");
}
*/
/*
int c = '\0';
unsigned long startTime = millis();
unsigned long httpResponseTimeOut = 10000; // 10 sec
while (client.connected() && ((millis() - startTime) < 	 	 	 httpResponseTimeOut)) {
	 if (client.available()) {
	 	 c = client.read();
	 	 Serial.print((char)c);
	} else {
	 	 Serial.print(".");
	 	 delay(100);
	}
}
*/

	Serial.println();
	Serial.println("Closing connection");
	Serial.println("=================================================");
	Serial.println("Sleeping");
	display.clear();
	display.drawString(0, 0, "Closing connection");
	display.display();
	delay(1000);
	display.clear();
	client.stop();
	// progress bar
	for (int i=1; i<=28; i++) {
	 	float progress = (float) i / 28 * 100;
	 	delay(500); // = all adds up to delay 14000 (14 sec)
		// draw percentage as String
	 	display.drawProgressBar(0, 32, 120, 10, (uint8_t) progress);
	 	display.display();
	 	display.setTextAlignment(TEXT_ALIGN_CENTER);
	 	display.drawString(64, 15, "Sleeping " + String((int) progress) + "%");
	 	display.display();
	 	display.clear();
	 	Serial.print((int) progress);Serial.print(",");
	}
	delay (1000);
}