Cranfield University we are interested in the ‘Internet of Things’ for environmental sensing. In this blog, we use one off SeedStudio’s Wio Node devices, with a home-made connection to a one wire temperature sensor, and finally an IOS shortcut on an iPhone to read and speak the value using Siri. In part, this blog follows this project.
Hardware
[caption id="attachment_1662" align="alignright" width="300"]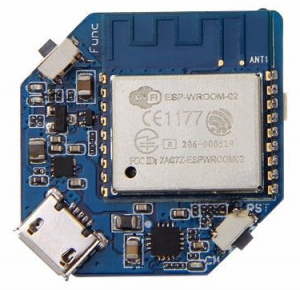 The WioNode from SeeedStudio[/caption]Microprocessor: We’ve had a few projects reported here with Arduino’s, Photons and Raspberry Pis, so it was interesting to get hold of a Wio Node device from Seeed Studio. This is an inexpensive ESP8266 based open-source Wi-Fi development board that supports Seeed’s Plug-n-Play Grove standard. There are two Grove sockets on the Node device. The node is marketed as permitting one to create a working IoT application in 5 minutes. Key to this is the Plug-n-Play physical sensor design, and the modular software tools in the app.
Sensor: To measure temperature, we used a DS18B20 Waterproof Temperature Sensor, available cheaply from a range of sources, such as here. The three wires are Red(VCC), Yellow (DATA), Black(GND).
The WioNode from SeeedStudio[/caption]Microprocessor: We’ve had a few projects reported here with Arduino’s, Photons and Raspberry Pis, so it was interesting to get hold of a Wio Node device from Seeed Studio. This is an inexpensive ESP8266 based open-source Wi-Fi development board that supports Seeed’s Plug-n-Play Grove standard. There are two Grove sockets on the Node device. The node is marketed as permitting one to create a working IoT application in 5 minutes. Key to this is the Plug-n-Play physical sensor design, and the modular software tools in the app.
Sensor: To measure temperature, we used a DS18B20 Waterproof Temperature Sensor, available cheaply from a range of sources, such as here. The three wires are Red(VCC), Yellow (DATA), Black(GND).
Construction
The Grove standard is a modular, standardized connector prototyping system, permitting Plug-n-Play connectivity with scores of sensor devices for measuring a wide range of phenomena. The advantage of Seeed Studio’s Wio range is that these simply plug into the sockets on the board. However, if one has a sensor without a Grove plug, there is a Protoshield prototyping board available. This can be used to wire up a sensor such as the DS18B20 to allow it to be connected. Unfortunately we didn’t have a Protoshield, however, we did have a pre-wired grove compatible plug that fitted the socket on the Wio Node – so a visit to the trusty soldering iron and heat-shrink cable was required. To make the DS18B20 work, a 4.7k pull-up resistor is required between the VCC and signal lines. The wiring diagram is as follows: [caption id="attachment_1666" align="aligncenter" width="300"] Wio Node wiring diagram[/caption]
After wiring up the temperature sensor as shown, and plugging it in, we could turn to the software to control it.
Wio Node wiring diagram[/caption]
After wiring up the temperature sensor as shown, and plugging it in, we could turn to the software to control it.
Software controller
[caption id="attachment_1668" align="alignright" width="138"]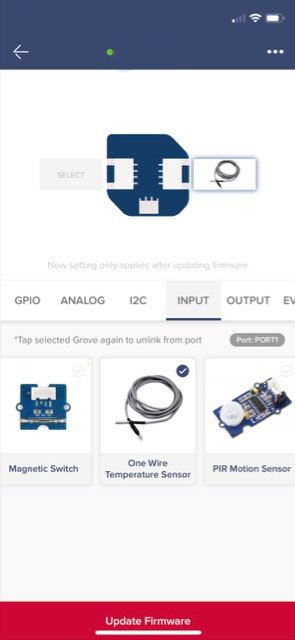 Wio Link Configuration[/caption]There is a Wio Link App available for smartphones, such as the Apple phone, that hugely simplifies the process of plugging in and operating sensors. We installed the app, and followed the simple instructions to add a new Wio Node device, and to enable Wi-Fi on it. Once this was working, we configured the Node to add our new sensor to the ‘S0’ port (there are two ports – S0 and S1).
[caption id="attachment_1672" align="alignleft" width="138"]
Wio Link Configuration[/caption]There is a Wio Link App available for smartphones, such as the Apple phone, that hugely simplifies the process of plugging in and operating sensors. We installed the app, and followed the simple instructions to add a new Wio Node device, and to enable Wi-Fi on it. Once this was working, we configured the Node to add our new sensor to the ‘S0’ port (there are two ports – S0 and S1).
[caption id="attachment_1672" align="alignleft" width="138"]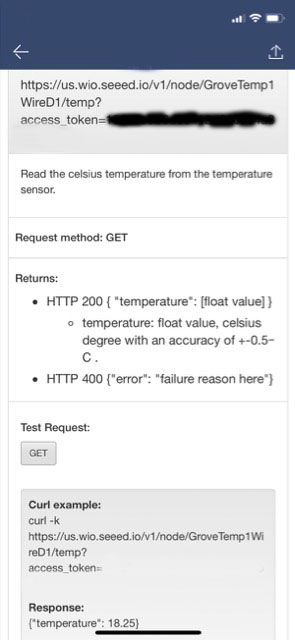 REST endpoints for new sensor[/caption]The option used was ‘One Wire Temperature Sensor’ on the GPIO toolbar. Once this was working, we ‘flashed’ the new settings onto the Node via the ‘Update Firmware’ option. Next, we could view the API settings for the new configuration.
The URL REST endpoints are shown and can be used to access the temperature value from the sensor. A test option within the app allows one to access the reading directly.
The REST URL takes the form, thus:
REST endpoints for new sensor[/caption]The option used was ‘One Wire Temperature Sensor’ on the GPIO toolbar. Once this was working, we ‘flashed’ the new settings onto the Node via the ‘Update Firmware’ option. Next, we could view the API settings for the new configuration.
The URL REST endpoints are shown and can be used to access the temperature value from the sensor. A test option within the app allows one to access the reading directly.
The REST URL takes the form, thus:
https://us.wio.seeed.io/v1/node/GroveTemp1WireD1/temp?access_token=TOKEN_GOES_HEREThe temperature values are returned as a JSON string, appearing thus:
{"temperature":19.1800000000001}
To access the actual value from the JSON, we will need to extract the number from the data pair (see step 3 below). Once we were happy the approach was all working, we copied the URL off for use in the next stage of the project.
Voice control
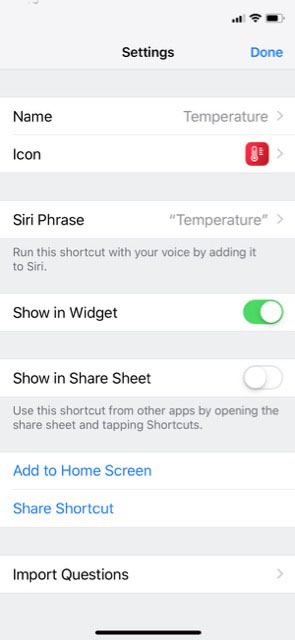
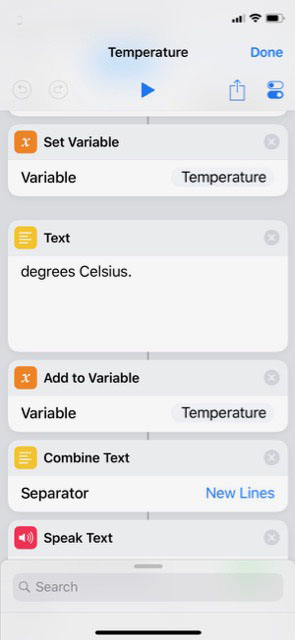
The project at this point is all working well – the temperature sensor reports to the Wio Node, and an API REST URL can be used to access the value. However, we can go further. We next used an Apple iPhone X, and its newly introduced ‘Shortcuts’ capability. This involves firstly installing the Shortcuts app from the iTunes App Store. Shortcuts allow one to build a relatively sophisticated programme very simply. We therefore set out to develop a ‘Shortcut’ that accessed the new sensor – for this we needed the URL (REST endpoint) from before. The shortcut settings are shown below, namely: (1) URL – enter in the URL from above; (2) Get Contents of URL [use Advanced options – method: GET, Header: temperature; (3) Get Dictionary Value [Key – temperature]; (4) Set Variable [Temperature] (saves value off to a new variable called Temperature); (5) Text [degrees Celsius] (creates a block of text to append); (6) Add to Variable [Temperature] (appends text to variable); (7) Combine Text [Separator – New Lines]; (8) Speak Text [Wait Until Finished]. A further elaboration is to use the ‘If‘ statement to check there was a valid reading (e.g. temperature > -20) ‘Else‘ advise of a problem.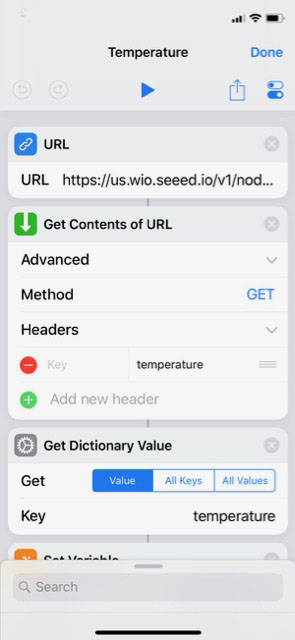
 We then added a custom icon ‘glyph’ (thermometer!) and colouring for the shortcut, and added this to the home screen of the phone. This allows the shortcut to be run easily.
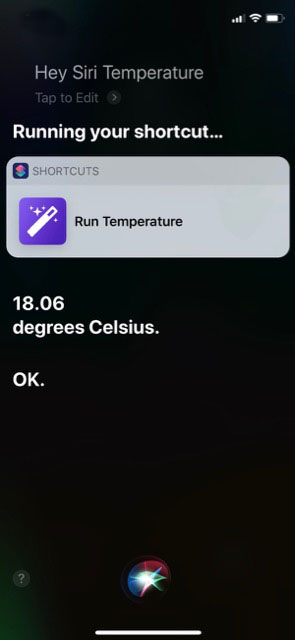
As a final finishing touch, we then also added a Siri shortcut with a simple voice command ‘temperature’ – this allows one to call ‘Hey Siri’ and give the command. The device sensor temperature reading is then spoken back. Pretty amazing! See the video below for an example.
We then added a custom icon ‘glyph’ (thermometer!) and colouring for the shortcut, and added this to the home screen of the phone. This allows the shortcut to be run easily.
As a final finishing touch, we then also added a Siri shortcut with a simple voice command ‘temperature’ – this allows one to call ‘Hey Siri’ and give the command. The device sensor temperature reading is then spoken back. Pretty amazing! See the video below for an example.