Introduction – Arduino
 Another area of informatics interest, here at Cranfield University is the use of the amazing Arduino microprocessor board for various projects. With the increasing emergence of the ‘Internet of Things’, ‘big data’ and machine to machine communication, the Arduino represents a great starting point for learning about this field.
What we wanted was to develop the basis for a simple data logger using an Arduino ‘Uno’, using a simple temperature and humidity sensor module, used to take readings that can be read off remotely with data retrieved via BlueTooth.
This post assumes you have already installed the Arduino IDE and are able to build and run programmes, or ‘sketches’. The Arduino site has an excellent Getting Started page if not.
Another area of informatics interest, here at Cranfield University is the use of the amazing Arduino microprocessor board for various projects. With the increasing emergence of the ‘Internet of Things’, ‘big data’ and machine to machine communication, the Arduino represents a great starting point for learning about this field.
What we wanted was to develop the basis for a simple data logger using an Arduino ‘Uno’, using a simple temperature and humidity sensor module, used to take readings that can be read off remotely with data retrieved via BlueTooth.
This post assumes you have already installed the Arduino IDE and are able to build and run programmes, or ‘sketches’. The Arduino site has an excellent Getting Started page if not.
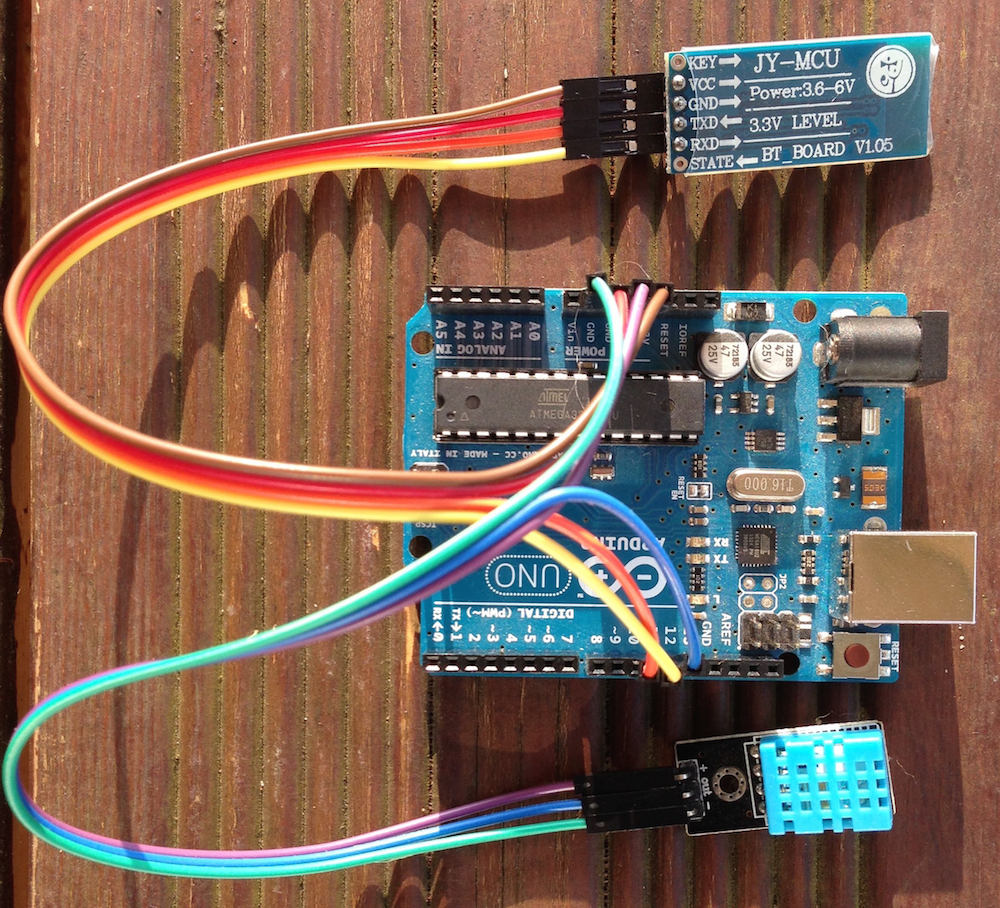
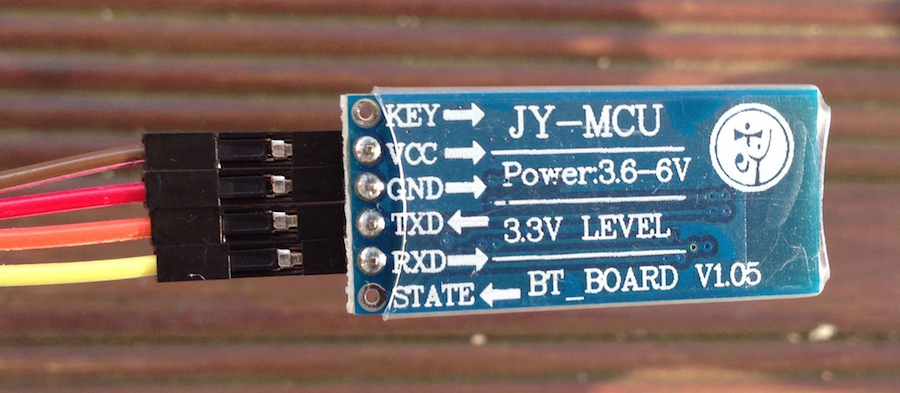 The first thing is to get the BlueTooth working. For this we bought an inexpensive JY-MCU module from the website dx.com. This unit has 4 pins, VCC voltage (3.3-6v); TX; RX; Gnd. Typically the other two connectors, State and Key, do not have pins soldered in.
The BlueTooth JY-MCU unit is advertised as being able to take power at either 3.3 or 5v. Many designs on the web for using this unit use resistors to split the voltage, but for this application we connected directly VCC to the Arduino 3.3v, and the Gnd to Gnd. The receive and transmit pins were connected respectively to digital pins 10 and 11. When hooked up with the software sketch below, the Bluetooth RX goes to the SoftwareSerial TX, and the BlueTooth TX to the SoftwareSerial RX respectively.
Configuring the BlueTooth module
Once connected, you can create a new sketch to allow communications. The first thing needed is configuration of the BlueTooth module settings – achieved by sending simple ‘AT’ commands to the unit. Byron’s Blog documents these codes really clearly, for example sending the module the command ‘AT+BAUD4’ sets its internal serial baud rate to 9,600bps. Note the device must be in an ‘unpaired’ state before these settings can be received.
A sketch can be set up to configure the module the way required, thus:
The first thing is to get the BlueTooth working. For this we bought an inexpensive JY-MCU module from the website dx.com. This unit has 4 pins, VCC voltage (3.3-6v); TX; RX; Gnd. Typically the other two connectors, State and Key, do not have pins soldered in.
The BlueTooth JY-MCU unit is advertised as being able to take power at either 3.3 or 5v. Many designs on the web for using this unit use resistors to split the voltage, but for this application we connected directly VCC to the Arduino 3.3v, and the Gnd to Gnd. The receive and transmit pins were connected respectively to digital pins 10 and 11. When hooked up with the software sketch below, the Bluetooth RX goes to the SoftwareSerial TX, and the BlueTooth TX to the SoftwareSerial RX respectively.
Configuring the BlueTooth module
Once connected, you can create a new sketch to allow communications. The first thing needed is configuration of the BlueTooth module settings – achieved by sending simple ‘AT’ commands to the unit. Byron’s Blog documents these codes really clearly, for example sending the module the command ‘AT+BAUD4’ sets its internal serial baud rate to 9,600bps. Note the device must be in an ‘unpaired’ state before these settings can be received.
A sketch can be set up to configure the module the way required, thus:
/* Include the software serial port library */
#include <SoftwareSerial.h>
/* to communicate with the Bluetooth module's TXD pin */
#define BT_SERIAL_TX 10
/* to communicate with the Bluetooth module's RXD pin */
#define BT_SERIAL_RX 11
/* Initialise the software serial port */
SoftwareSerial BluetoothSerial(BT_SERIAL_TX, BT_SERIAL_RX);

void setup()  {
  /* Set the baud rate for the hardware serial port */
  Serial.begin(9600);
  /* Set the baud rate for the software serial port */
  BluetoothSerial.begin(9600);
  delay(1000);

  // Should respond with OK
  BluetoothSerial.print("AT");
  waitForResponse();

  // Should respond with its version
  BluetoothSerial.print("AT+VERSION");
  waitForResponse();

  // Set pin to 1234
  BluetoothSerial.print("AT+PIN1234");
  waitForResponse();

  // Set the name to BLU
  BluetoothSerial.print("AT+NAMEBLU");
  waitForResponse();

  // Set baudrate from 9600 (default) to 57600
  // * Note of warning * - many people report issues after increasing JY-MCU
  //  baud rate upwards from the default 9,600bps rate (e.g. 'AT+BAUD4')
  //  so you may want to leave this and not alter the speed!!
  BluetoothSerial.print("AT+BAUD7");
  waitForResponse();

  Serial.println("Finished!");
}

// Function to pass BlueTooth output through to serial port output
void waitForResponse() {
    delay(1000);
    while (BluetoothSerial.available()) {
      Serial.write(BluetoothSerial.read());
    }
    Serial.write("\n");
}

void loop() { }
Alternatively, by contrast to pre-programmed statements as above, Clinertech’s great sketch here allows AT values to be typed in and set interactively.
The warning in the code above highlights the potential pitfalls of changing the speed of the internal BlueTooth serial communication to be higher than the default 9,600bps. We found that 57,600bps worked OK (‘AT+BAUD7’) on our unit. However, note that once this change is made, the code connecting to the Software Serial port also needs its speed adjusting to the new rate selected.
Temperature and Humidity
Once the BlueTooth module is configured correctly, the next step is to introduce the temperature/humidity module to the Arduino Uno. For this, we used a ‘DHT-11‘ module. This has three pins, + (vcc), – (gnd) and signal (we connected this to Digital pin 12).
Note that a software library ‘TinyDHT’ was used to manage the communications with this sensor. The library is included in the code below in the same way the SoftwareSerial library is included.
// BT Data Logger
// BlueTooth Configuration
/* Include the software serial port library */
#include <SoftwareSerial.h>
/* to communicate with the Bluetooth module's TXD pin */
#define BT_SERIAL_TX 10
/* to communicate with the Bluetooth module's RXD pin */
#define BT_SERIAL_RX 11
/* Initialise the software serial port */
SoftwareSerial BluetoothSerial(BT_SERIAL_TX, BT_SERIAL_RX);

// DHT-11 Configuration
#include <TinyDHT.h> // lightweight DHT sensor library
// Uncomment whatever type sensor you are using!
#define DHTTYPE DHT11   // DHT 11
//#define DHTTYPE DHT22   // DHT 22 (AM2302)
//#define DHTTYPE DHT21   // DHT 21 (AM2301)
#define TEMPTYPE 0        // Use 0 for Celsius, 1 for Fahrenheit
#define DHTPIN 12
DHT dht(DHTPIN, DHTTYPE); // Define Temp Sensor

void setup() {
  /* Set the baud rate for the software serial port */
  BluetoothSerial.begin(57600); // Initialise BlueTooth
  delay(1000);
  dht.begin();  // Initialize DHT Teperature Sensor
  BluetoothSerial.print("Starting ...");
}

void loop() {
  // Take readings
  int8_t h  = dht.readHumidity();              // Read humidity
  int16_t t = dht.readTemperature(TEMPTYPE);   // read temperature

  if ( t == BAD_TEMP || h == BAD_HUM ) { // if error conditions (see TinyDHT.h)
  } else {
     BluetoothSerial.print("Temperature: ");
     BluetoothSerial.print(t);
     BluetoothSerial.print(", Humidity: ");
     BluetoothSerial.print(h);
     BluetoothSerial.print("\n");
  }
}
This code sets up the ‘software serial’ port to receive the output from the BlueTooth module. Readings of temperature and humidity are then taken and output constantly.
 Accessing the data
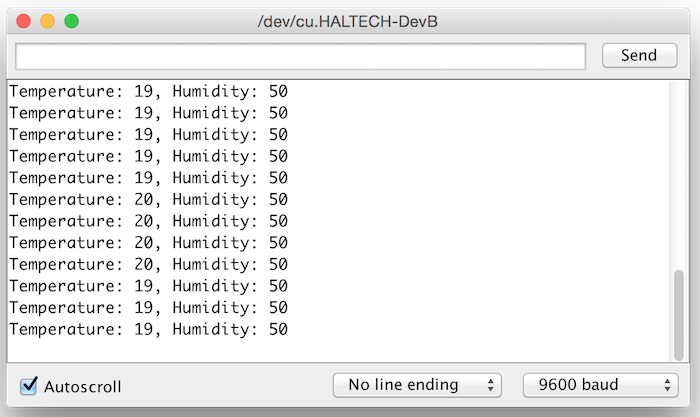
To access the data being sent by the Arduino Uno, a few steps are required. First you need a computer with a BlueTooth capability. If your computer doesn’t have BlueTooth, inexpensive ‘USB BlueTooth dongles’ can be bought. By example, the instructions to do this using a MacBook are as follows: the laptop BlueTooth is turned ‘on’, and the ‘System preferences’ -> ‘Network’ dialogue opened. The ‘BlueTooth option is selected, and the Arduino module should then hopefully appear in the available devices list and can be selected and ‘paired’ (using the pairing number set earlier – e.g. the default being ‘1234’). Finally, with BlueTooth still connected and paired, the last step is to open a serial monitor window, connected to the BlueTooth port, which is then used for monitoring the BlueTooth Software Serial port and the data being generated. To achieve this last step, open the Arduino IDE. First select the menu ‘Tools’ -> ‘Port’, then select the BlueTooth device (with the name set earlier); finally select ‘Tools’ -> ‘Serial Monitor’. As long as the baud rate matches that of the BlueTooth module the data readings should be shown as here.
What next?
Having this all working is just the start of a bigger project. One option would next be to attach to the Arduino an SD card writer, to allow data to be saved locally, with BlueTooth then used to access the data periodically. Data could be time-stamped using a separate clock module, or geo-positioned with a GPS module.
Accessing the data
To access the data being sent by the Arduino Uno, a few steps are required. First you need a computer with a BlueTooth capability. If your computer doesn’t have BlueTooth, inexpensive ‘USB BlueTooth dongles’ can be bought. By example, the instructions to do this using a MacBook are as follows: the laptop BlueTooth is turned ‘on’, and the ‘System preferences’ -> ‘Network’ dialogue opened. The ‘BlueTooth option is selected, and the Arduino module should then hopefully appear in the available devices list and can be selected and ‘paired’ (using the pairing number set earlier – e.g. the default being ‘1234’). Finally, with BlueTooth still connected and paired, the last step is to open a serial monitor window, connected to the BlueTooth port, which is then used for monitoring the BlueTooth Software Serial port and the data being generated. To achieve this last step, open the Arduino IDE. First select the menu ‘Tools’ -> ‘Port’, then select the BlueTooth device (with the name set earlier); finally select ‘Tools’ -> ‘Serial Monitor’. As long as the baud rate matches that of the BlueTooth module the data readings should be shown as here.
What next?
Having this all working is just the start of a bigger project. One option would next be to attach to the Arduino an SD card writer, to allow data to be saved locally, with BlueTooth then used to access the data periodically. Data could be time-stamped using a separate clock module, or geo-positioned with a GPS module.
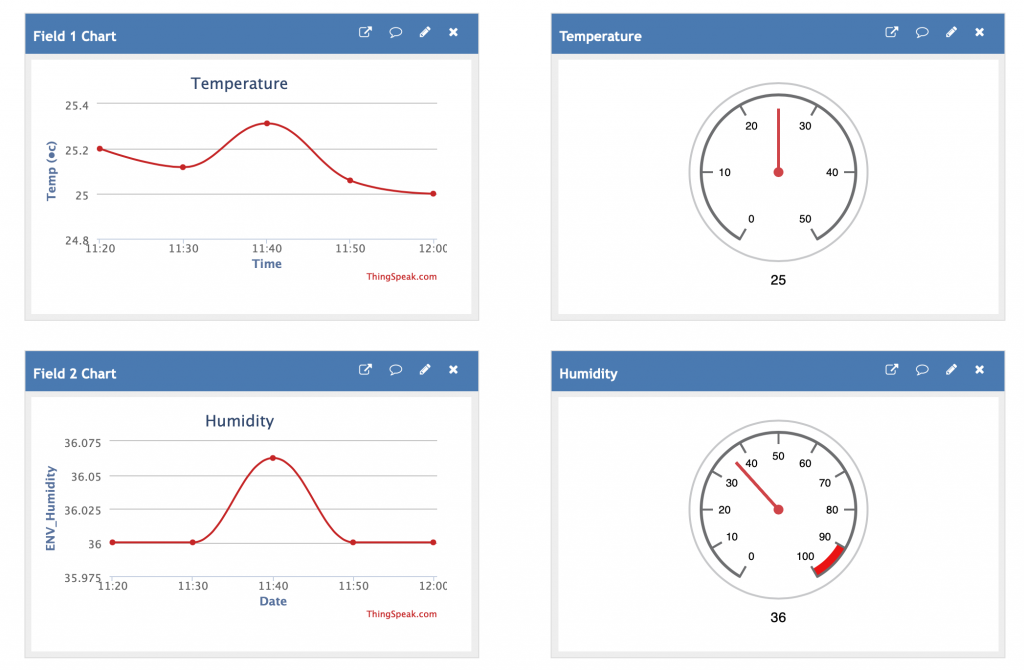
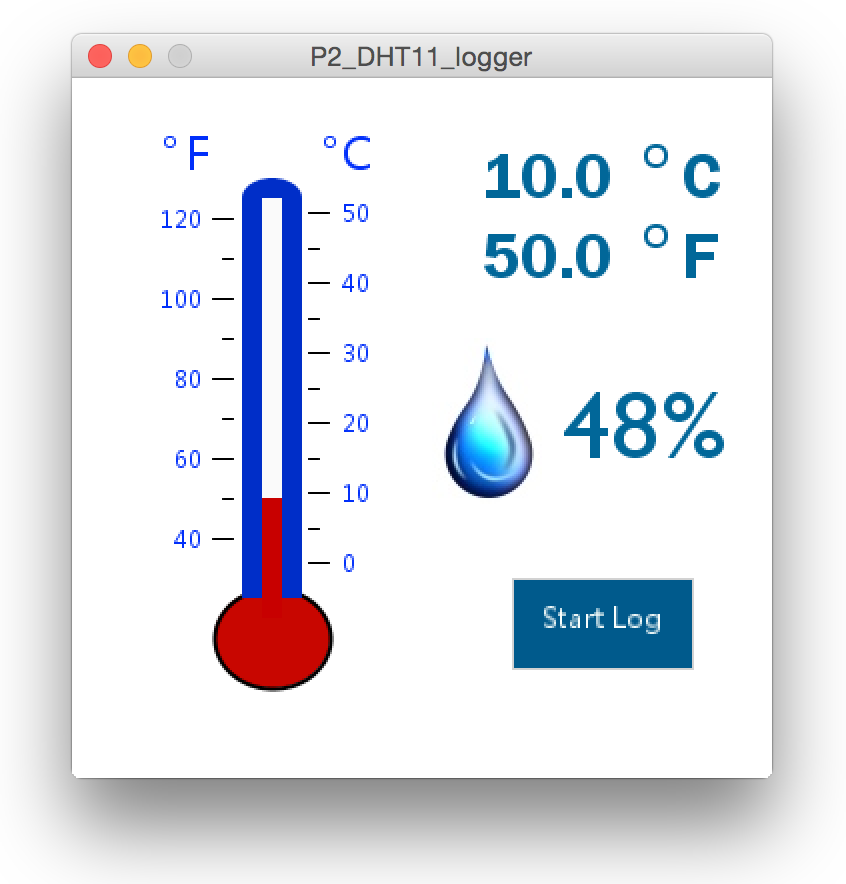 To do something more useful with the data being received, there are also a number of options. The ‘Processing’ language is gaining interest (see https://processing.org), and can be used to extract data (perhaps re-formatted as a data stream), suitable for graphing or further analysis. Of interest, the Arduino IDE itself is a subset of Processing. One excellent example using Processing that we followed and adapted here is Bhatt’s P2_DHT11_Logger project.
A further development beyond this could be to write a mobile device ‘app’ to make the connection via the mobile device’s BlueTooth. Future posts here may develop on these themes.]]>
To do something more useful with the data being received, there are also a number of options. The ‘Processing’ language is gaining interest (see https://processing.org), and can be used to extract data (perhaps re-formatted as a data stream), suitable for graphing or further analysis. Of interest, the Arduino IDE itself is a subset of Processing. One excellent example using Processing that we followed and adapted here is Bhatt’s P2_DHT11_Logger project.
A further development beyond this could be to write a mobile device ‘app’ to make the connection via the mobile device’s BlueTooth. Future posts here may develop on these themes.]]>
Cranfield University GeoThread Blog