


One such device we use is the Particle Photon, and a typical attached device for environmental sensing is the DHT11 temperature/humidity sensor. We have discussed building the hardware to do this in an earlier blog. But here in this blog, we consider how to use ‘ThingSpeak‘, the ‘open IoT platform with MATLAB analytics‘ to receive, visualise and analyse the data. In this way, the Particle Photon will be used to collect the data, will transmit it to the Particle Cloud, and from there, a ‘WebHook integration’ will transmit the data to ThingSpeak for further use.
Particle Photon
For the code, we adapted the AdaFruit DHT11 sketch for Photon. Having calculated temperature (t), humidity (h), heat index (hi) and dew point (dp), the values are published (Particle.publish) up to the Particle Cloud.
#include// Written by ladyada, public domain #define DHTPIN 2 // pin we're connected to #define DHTTYPE DHT11 // DHT 11 // Connect pin 1 (on the left) of the sensor to +5V // Connect pin 2 of the sensor to DHTPIN // Connect pin 4 (on the right) of the sensor to GROUND // Connect a 10K resistor from pin 2 (data) to pin 1 (power) of the sensor DHT dht(DHTPIN, DHTTYPE); void setup() { Serial.begin(9600); Serial.println("DHT11 environment sensing"); dht.begin(); } void loop() { delay(20000); float h = dht.getHumidity(); // Read temperature as Celsius float t = dht.getTempCelcius(); // Read temperature as Farenheit float f = dht.getTempFarenheit(); // Check if any reads failed and exit early (to try again). if (isnan(h) || isnan(t) || isnan(f)) { Serial.println("Failed to read from DHT sensor!"); return; } // Compute heat index // Must send in temp here in Fahrenheit! float hi = dht.getHeatIndex(); float dp = dht.getDewPoint(); float k = dht.getTempKelvin(); // ThingSpeak // See https://community.particle.io/t/how-to-set-up-a-json-for-multiple-variables-in-a-webhook-integration/33172/4 const char * eventName = "thingSpeakWrite_"; // This must match the name of the event you use for the WebHook // ThingSpeak Channel Info unsigned long myChannelNumber =XXXXXXX; const char * myWriteAPIKey = "XXXXXXXXXXXXXX"; Particle.publish(eventName, "{ \"Humidity\": \"" + String(h) + "\", \"Temperature\": \"" + String(t) + "\", \"Dew_point\": \"" + String(dp) + "\", \"Heat_Index\": \"" + String(hi) + "\", \"key\": \"" + myWriteAPIKey + "\" }", PRIVATE, NO_ACK); // delay(15000); }
Of note here is how the data are grouped for publication into a JSON block. Normally, Particle.Publish takes the pre-defined variable ‘{{{PARTICLE_EVENT_VALUE}}}’. However, in our case, we want to transmit more than one data value. We do this by building a JSON block and assigning it to an event name (e.g. ‘thingSpeakWrite_’). This is explained well in this blog article. The code (from above):
Particle.publish(eventName, "{ \"Humidity\": \"" + String(h) + "\", \"Temperature\": \"" + String(t) + "\", \"Dew_point\": \"" + String(dp) + "\", \"Heat_Index\": \"" + String(hi) + "\", \"key\": \"" + myWriteAPIKey + "\" }", PRIVATE, NO_ACK);
will resolve to, for example:
{
  "Humidity":"36.000000",
  "Temperature":"25.000000",
  "Dew_point":"8.879691",
  "Heat_Index":"25.571789",
  "key":"XXXXXXXXXXXXXX"
}
Next in the Particle Photon Cloud interface, we can build a new ‘Integration’, following the Particle Tutorial example. We create a new Integration of type ‘WebHook’, and fill in the basic settings as follows:
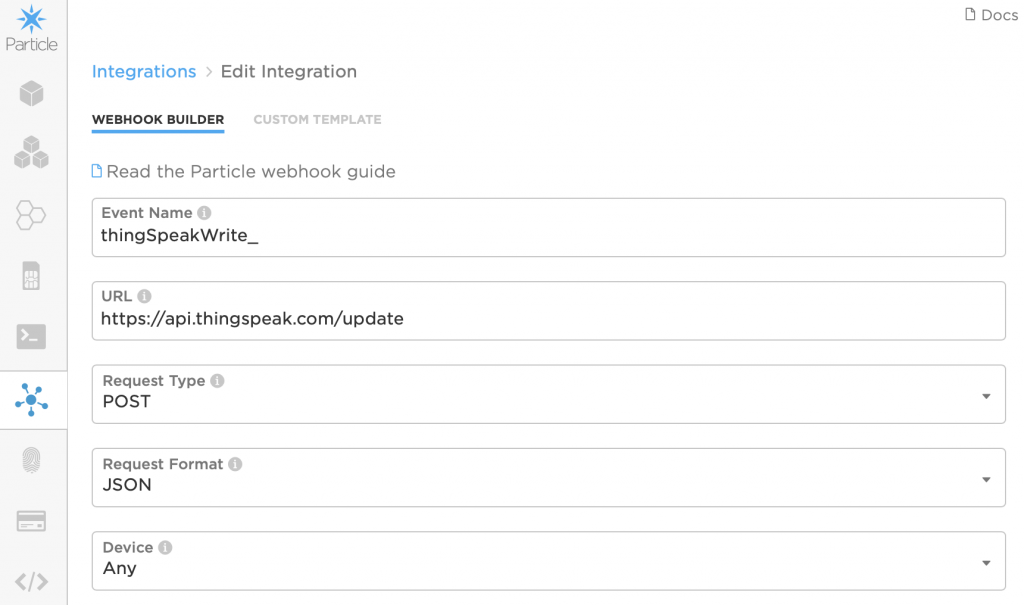
Note the request format is JSON. Then, selecting the ‘Advanced Settings‘, we enter the following as the JSON block, attaching each parameter to a field number that will then appear in the ThingSpeak Channel.
{
  "event": "thingSpeakWrite_",
  "url": "https://api.thingspeak.com/update",
  "requestType": "POST",
  "api_key": "{{{key}}}",
  "field1": "{{{Temperature}}}",
  "field2": "{{{Humidity}}}",
  "field3": "{{{Dew_point}}}",
  "field4": "{{{Heat_Index}}}"
}
Hitting ‘Save’ should save and start up the Integration. Next, following the Particle Tutorial example, we created a new (free) ThingSpeak account to receive and process the data.
ThingSpeak
In ThingSpeak, we created a new ‘Channel‘, gave it a name and description, and defined the ‘fields‘ to receive data as above, thus:
field1: Temperature
field2: Humidity
field3: Dew_point
field4: Heat_Index
We also set the ‘Metadata’ setting to ‘JSON’
Finally, we save the Channel, and are ready to then visualise the data.
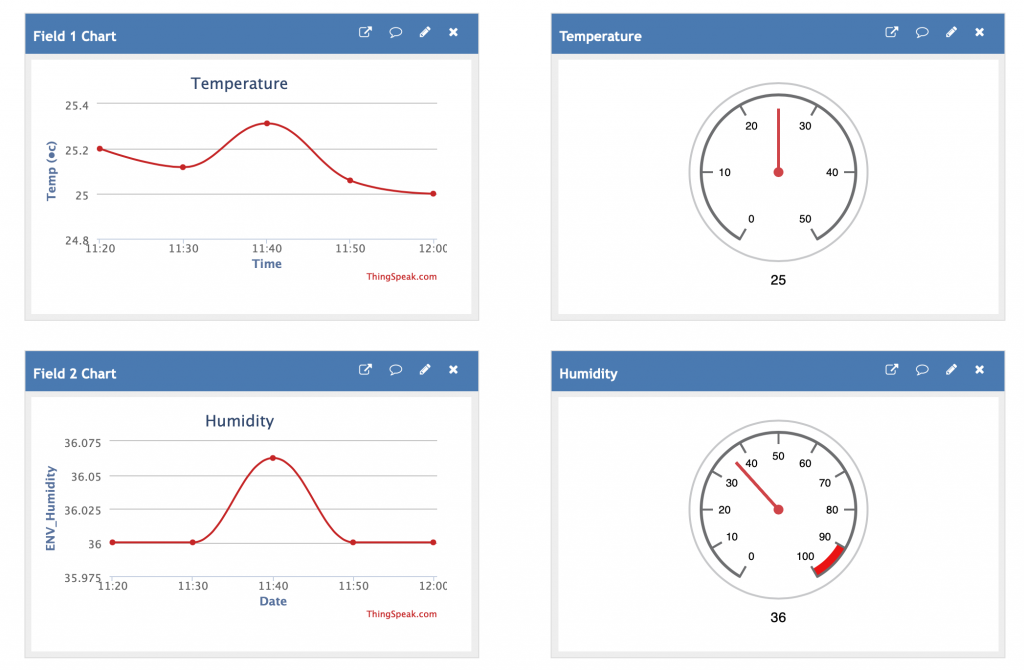
ThingSpeak allows us to direct the data received into a number of app tools, graphs, messaging utilities, analytics, MatLab and so on. Here we simply directed the output to a line graph and a gauge graphic. In the case below, the line graph type is set to ‘Spline’ on a ’10 minute’ average, and the temperature gauge range set from 0-50.
Conclusions
This exercise has shown how to build a WebHook Integration from a Particle Photon, and to package up multiple data items as a JSON block, to pass this through the Particle Cloud and on to ThingSpeak for visualisation.
Yet to be explored are the many other tools ThingSpeak offers for processing the data: MatLab Analysis and Visualisations, PlugIns, ThingTweet, TimeControl, React, TalkBack and ThingHTTP.
ThingSpeak is a great online tool for handling IoT data, but note it is not the only choice available, and there are other similar online tools that could be used. Alternatively, one could also build a solution ‘in-house’ using packages such as ThingsBoard to receive, process and visualise the data arising from the IoT sensors. A good review of the choices of tools available is online on this blog, and there is lots of choice.