


Cranfield University as a post Christmas project, we wanted to explore some of the possibilities for interconnected devices, sensors and data streams. To do this we are using the fantastic ‘Photon’ microprocessor controller (formally called the Spark) from Particle (https://www.particle.io).
The inexpensive Photon device (https://www.particle.io/prototype) provides a microprocessor board and an array of digital and analogue pins for connecting up your sensors and actuators and a USB socket for providing power (and local data services). The Photon’s real strength lies in its onboard Broadcom WiFi chip. Whereas an Arduino or similar board is effectively self-contained and fiddly to connect to the rest of the world, the Photon board allows you to connect directly and immediately to the Particle cloud (a web service provided by Particle) to which all the data streams can be sent. It is therefore straight forward to develop a simple data logging application, streaming data onto the cloud for further processing and analysis. The Photon is also broadly code-compatible with the Arduino – so code can be transposed across easily.
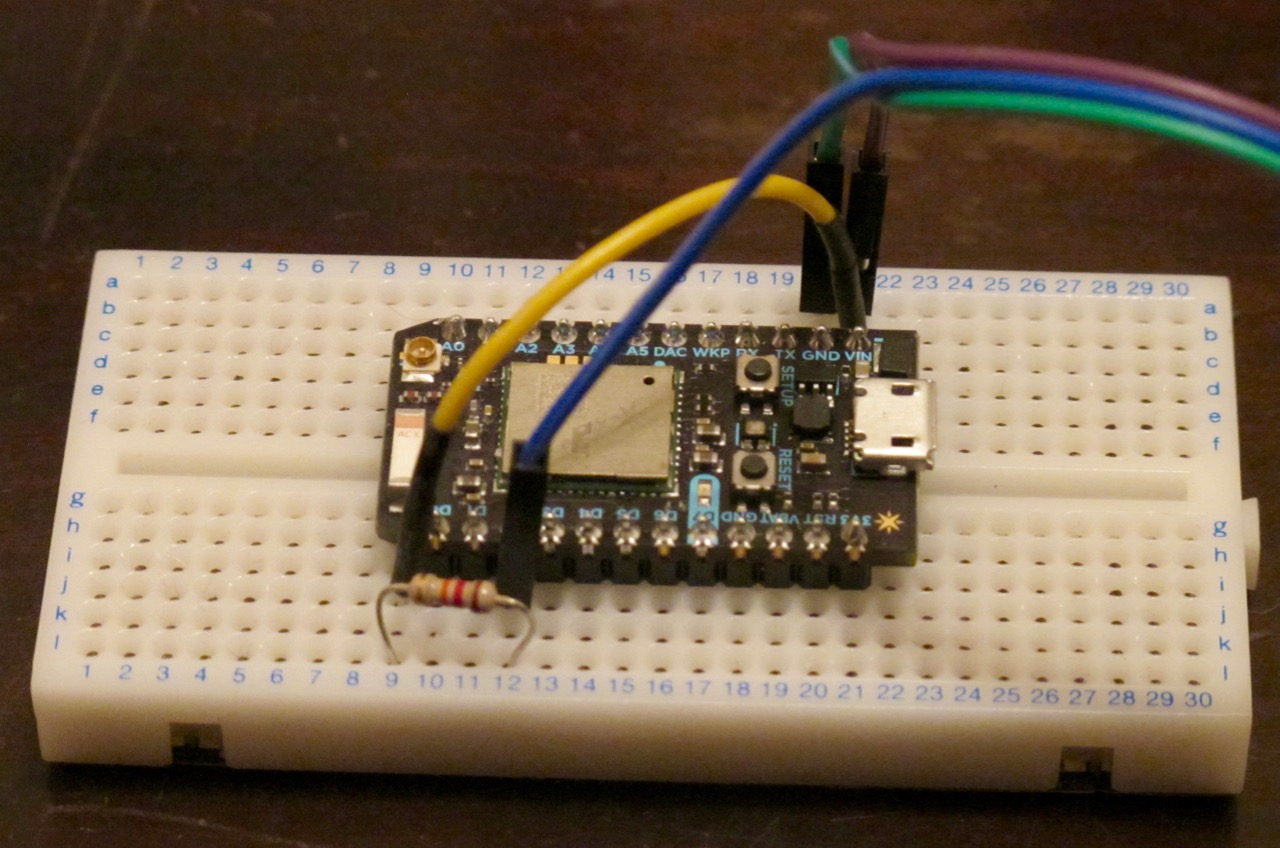
If you are not on WiFi, Particle also offers the ‘Electron’ device, which offers the same capabilities, but takes a mobile phone SIM card instead of WiFi, allowing for remote access. Both the Photon and the Electron are really designed for prototyping up ideas; once you have a working design, you can use Particle’s PØ and P1 devices for mass production! Shown below is the Photon mounted onto a breadboard.
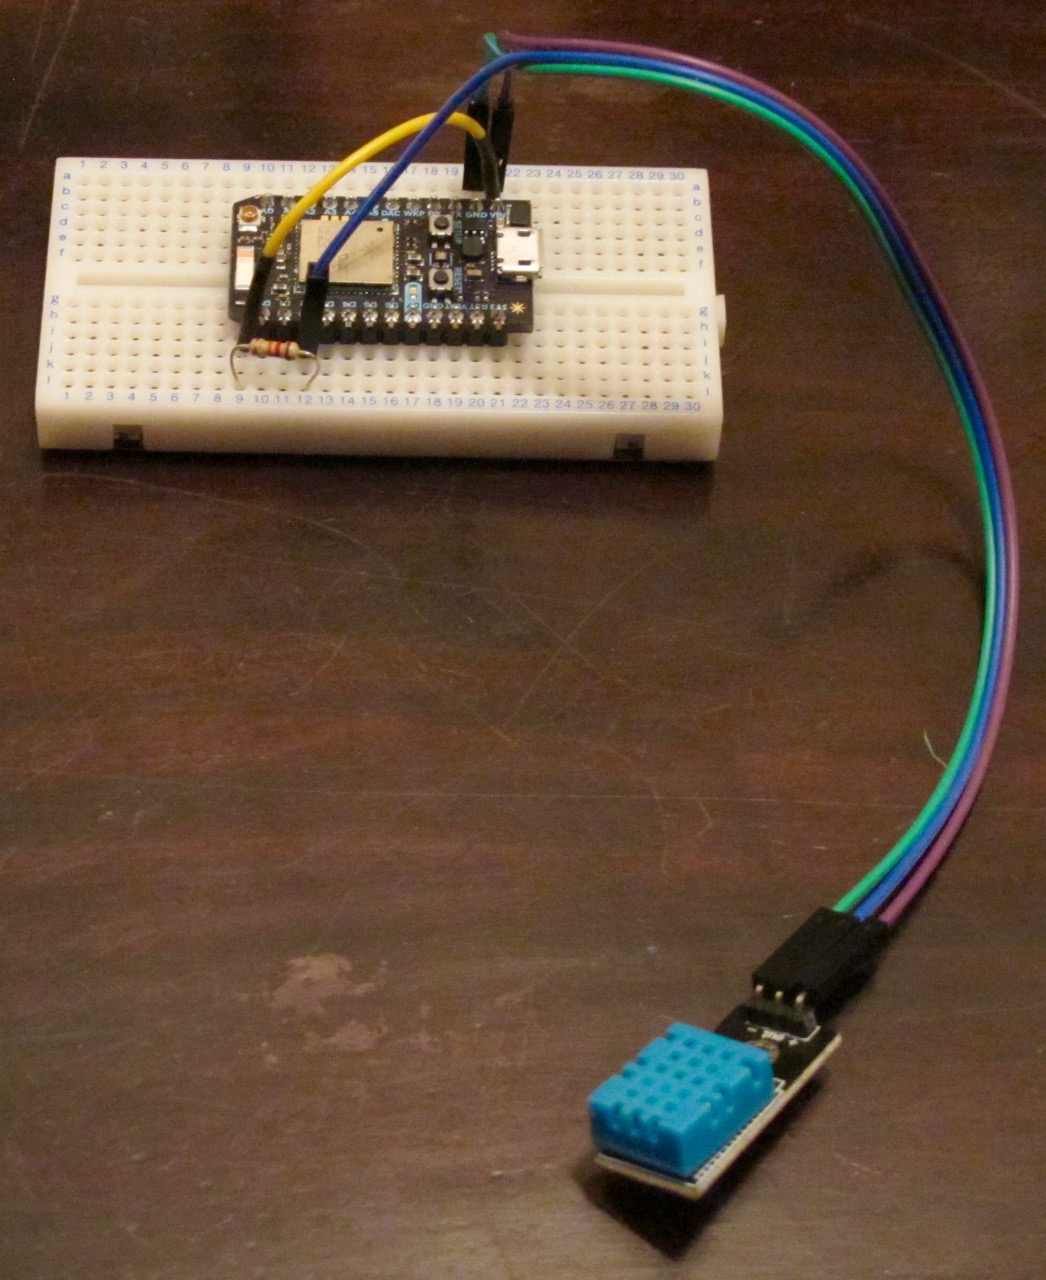
 The project at hand is to develop a simple data logger for temperature and humidity, using the trusty DHT11 sensor. In that sense, this project is similar to our earlier Bluetooth data logger – but now the data will go to the Internet via its WiFi connection (it can store up to 5 connections).
The steps required (broadly following the excellent Particle startup guide) are:
The project at hand is to develop a simple data logger for temperature and humidity, using the trusty DHT11 sensor. In that sense, this project is similar to our earlier Bluetooth data logger – but now the data will go to the Internet via its WiFi connection (it can store up to 5 connections).
The steps required (broadly following the excellent Particle startup guide) are:
- Create an account on the Particle website portal – https://build.particle.io/login
- Download to your phone (e.g. iPhone/Android) the Particle ‘App’ and log in
- Power up the Photon (we used a standard USB micro B cable from a phone charger)
- We next need to get the Photon to connect to the local WiFi. Press and hold (carefully!) the Photon setup button to enter its setup mode
- Use the phone’s WiFi to connect to the WiFi from the Photon – the SSID is something like ‘Photon-XXX’ where ‘XXX’ is the unique number of the device . Note, we had terrible trouble connecting initially the Photon to a WEP encrypted broadband router. Turning off all router security worked fine – but this is no long-term solution. Enabling WPA router security however was all that was needed to ensure easy connection to the Photon (conclusion – use WPA not WEP security!!). The App guides you through introducing the Photon onto the network, and adding the WPA WiFi security phrase. Once the Photon is finally online, it can take a few minutes (6-12) to update its firmware – leave it alone to do this! You also get a chance to give your device a name – useful if you intend to have several devices.
- Next we need to wire up the Photon. A breadboard is a useful aid for initial prototyping.
- Connect pin 1 (on the left) of the sensor to +5V
- Connect pin 2 of the sensor to whatever your DHTPIN is
- Connect pin 4 (on the right) of the DHT11 sensor to GROUND
- Connect a 10K resistor from pin 2 (data) to pin 1 (power) of the sensor (we only had a 12k resistor handy but this was OK). Leave the device powered up ready to receive software code via the web.
 The next step moves from the hardware to the software. Particle offer a number of means to control and programme the photon. The phone App itself has a ‘tinker’ mode which allows one to turn on and off on-board LEDs etc. Next up, there is a web-based development environment (IDE) (https://build.particle.io/build/) – a very elegant solution to programming the device. Next there is a programme that can be installed, the ‘Particle Dev‘ (rather like the Arduino IDE), and finally command-line directives using Node.JS. To start with at least, it is easiest to use the web IDE interface. Also, in many ways the whole idea of the Internet of Things is to use cloud services – so data collection should also be a cloud-based activity.
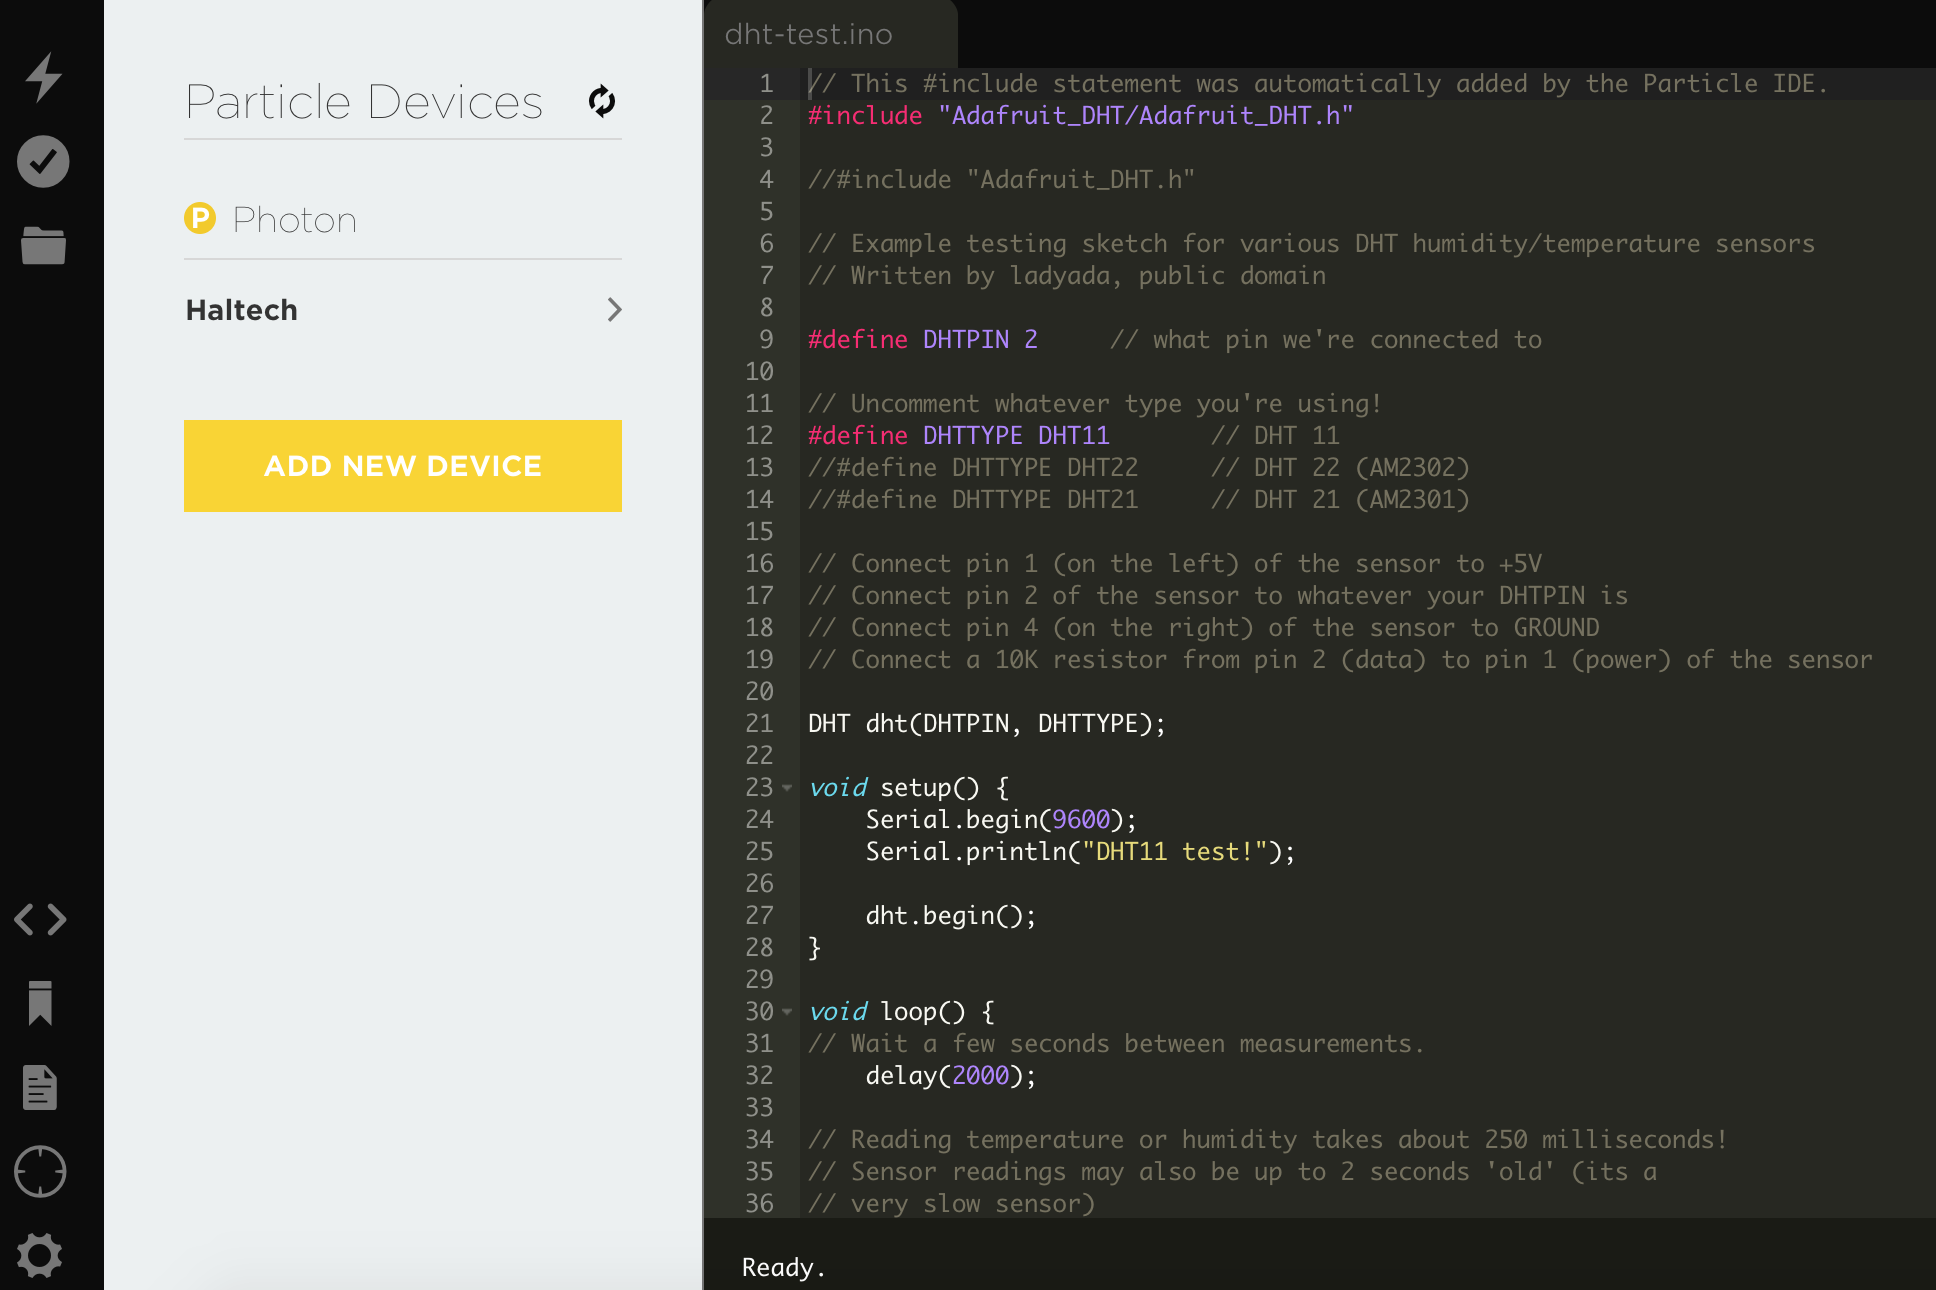 To get us going, we selected the ‘Community Library’ called ‘ADAFRUIT_DHT’ developed by Adafruit (they produce great microprocessor kit too by the way). Their ‘dht-test.ino’ code can be adapted and edited, and the library added to the project. For editing, you will need to indicate the digital pin the DHT11 is connected to, e.g. for pin 2 ‘#define DHTPIN 2’. Also the type of sensor, e.g. for DHT11 ‘#define DHTTYPE DHT11’. One can also edit the loop delay for taking readings (e.g. for 5 seconds, ‘delay(5000);’).
In the run loop, we can also add instructions to publish the data readings to the Particle cloud. This is done by adding the lines:
To get us going, we selected the ‘Community Library’ called ‘ADAFRUIT_DHT’ developed by Adafruit (they produce great microprocessor kit too by the way). Their ‘dht-test.ino’ code can be adapted and edited, and the library added to the project. For editing, you will need to indicate the digital pin the DHT11 is connected to, e.g. for pin 2 ‘#define DHTPIN 2’. Also the type of sensor, e.g. for DHT11 ‘#define DHTTYPE DHT11’. One can also edit the loop delay for taking readings (e.g. for 5 seconds, ‘delay(5000);’).
In the run loop, we can also add instructions to publish the data readings to the Particle cloud. This is done by adding the lines:
Particle.publish("Humidity", String(h));
Particle.publish("Temperature", String(t));
Particle.publish("Dew point", String(dp));
Particle.publish("Heat Index", String(hi));
Once ready, the code can be flashed to (written to) the Photon device, over the Internet – neat!
And that is it – the Photon should now be up and running logging temperature and humidity data etc every 5 seconds. With thanks and acknowledgements to Adafruit, the software code used is shown at the end of this article.
The next task is to recover the data arriving on the Particle cloud originating from the device. There are a number of ways to do this, but the easiest initial means is to use the Particle Dashboard (see https://dashboard.particle.io/user/logs). This allows you to connect to, receive and visualise data from your running device.
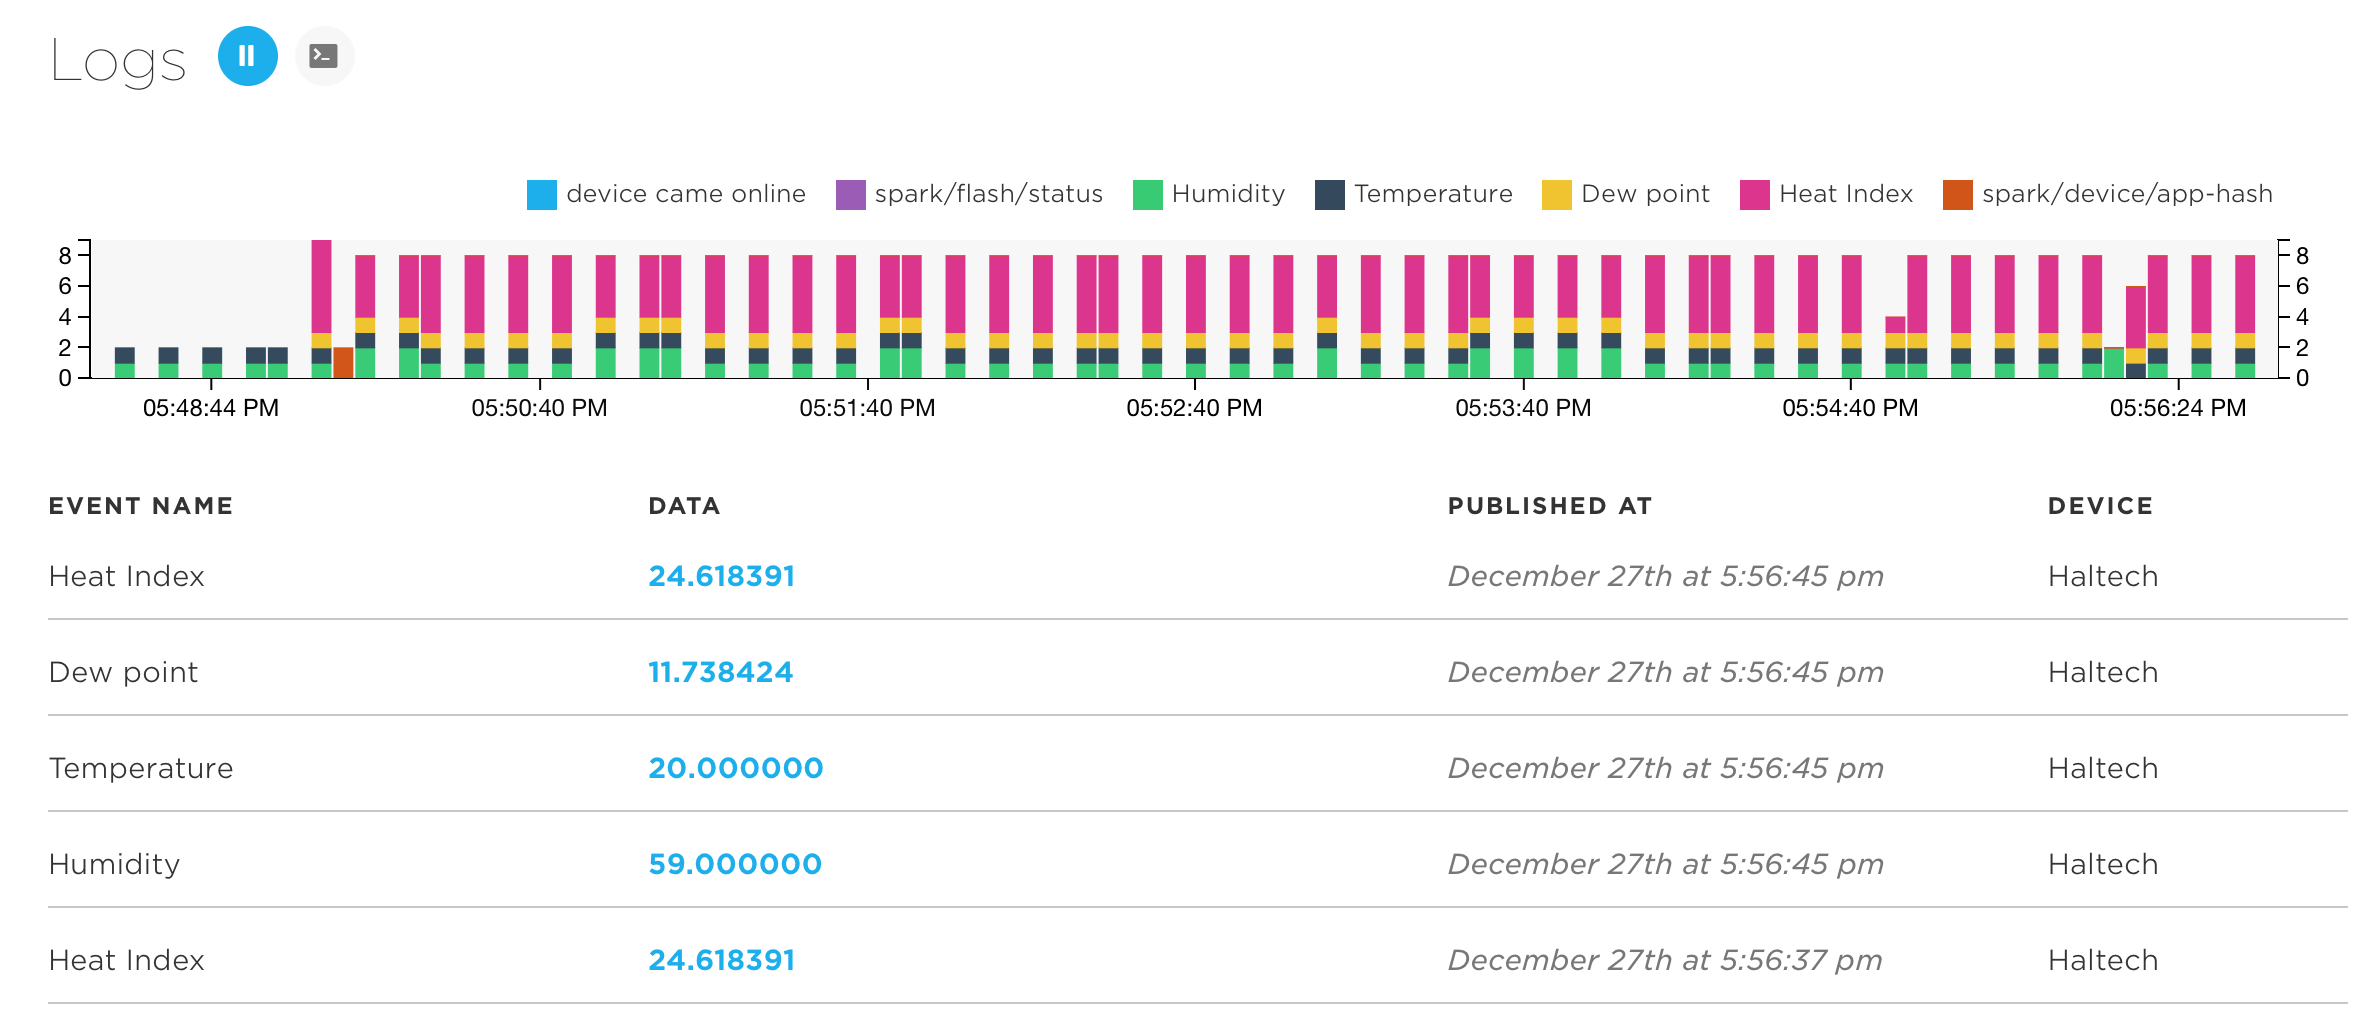 You can see the data arriving at the dashboard, each reading being timestamped.
Enhancements for this project
This project is only the start. One can capture and store data streams arriving from the Photon in a database. The database can then be consulted to produce time series runs of data. Multiple Photon devices can be scattered across an area, and a web map of interpolated meteorological data be produced. Other sensors can be added (e.g. a GPS) and so on for locational advice. The whole assembly can be ruggedised in a waterproof box. Really there are so many ways to develop and enhance the basic concept.What comes next?
The Particle Photon (and Electron) are truly amazing devices – so powerful and so easy to connect up to the Internet. Truly these devices can contribute to the ‘Internet of Things’. To get some real inspiration as to the sorts of projects that exist for these devices, visit https://particle.hackster.io. If you want to store the data arising from the sensor, also have a look at https://data.sparkfun.com/Here is the software code used in this prototype:
// This #include statement was automatically added by the Particle IDE.
#include "Adafruit_DHT/Adafruit_DHT.h"
// Example testing sketch for various DHT humidity/temperature sensors
// Written by ladyada, public domain
#define DHTPIN 2 // what pin we’re connected to
// Uncomment whatever type you’re using!
#define DHTTYPE DHT11 // DHT 11
//#define DHTTYPE DHT22 // DHT 22 (AM2302)
//#define DHTTYPE DHT21 // DHT 21 (AM2301)
// Connect pin 1 (on the left) of the sensor to +5V
// Connect pin 2 of the sensor to whatever your DHTPIN is
// Connect pin 4 (on the right) of the sensor to GROUND
// Connect a 10K resistor from pin 2 (data) to pin 1 (power) of the sensor
DHT dht(DHTPIN, DHTTYPE);
void setup() {
Serial.begin(9600);
Serial.println(“DHT11 test!”);
dht.begin();
}
void loop() {
// Wait a few seconds between measurements.
delay(2000);
// Reading temperature or humidity takes about 250 milliseconds!
// Sensor readings may also be up to 2 seconds ‘old’ (its a
// very slow sensor)
float h = dht.getHumidity();
// Read temperature as Celsius
float t = dht.getTempCelcius();
// Read temperature as Farenheit
float f = dht.getTempFarenheit();
// Check if any reads failed and exit early (to try again).
if (isnan(h) || isnan(t) || isnan(f)) {
Serial.println(“Failed to read from DHT sensor!”);
return;
}
// Compute heat index
// Must send in temp in Fahrenheit!
float hi = dht.getHeatIndex();
float dp = dht.getDewPoint();
float k = dht.getTempKelvin();
Serial.print(“Humid: “);
Serial.print(h);
Serial.print(“% – “);
Serial.print(“Temp: “);
Serial.print(t);
Serial.print(“*C “);
Serial.print(f);
Serial.print(“*F “);
Serial.print(k);
Serial.print(“*K – “);
Serial.print(“DewP: “);
Serial.print(dp);
Serial.print(“*C – “);
Serial.print(“HeatI: “);
Serial.print(hi);
Serial.println(“*C”);
Serial.println(Time.timeStr());
Particle.publish(“Humidity”, String(h));
Particle.publish(“Temperature”, String(t));
Particle.publish(“Dew point”, String(dp));
Particle.publish(“Heat Index”, String(hi));
delay(5000);
}]]>